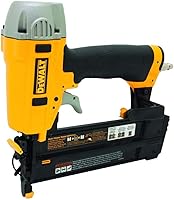
Ryobi P321 18V Airstrike Brad Nailer Review: Worth It? (October 2026)
The Ryobi P321 suits existing ONE+ owners who need a cordless 18-gauge brad nailer for light trim and small assemblies. Choose the P322 for its brushless motor and adjustment controls, or the WEN kit if you need a battery and charger.

On this page (9 sections)
- Is the Ryobi P321 right for your trim work?
- What comes with the P321, and what else do you need?
- When is the P322 worth choosing instead?
- Who should choose Craftsman or WEN instead?
- What should you confirm before ordering a P321?
- How do you set up a brad nailer for clean trim work?
- Which common mistakes cause poor brad-nailer results?
- How should you use and care for the P321 safely?
- Should you buy the Ryobi P321?
The Ryobi P321 suits existing ONE+ owners who need a cordless brad nailer for light trim and small woodworking assemblies. Its main buying advantage is fitting a battery setup you already use.
Choose it by the work you need to fasten, not just the battery platform. The P322 offers more clearly defined operating controls, while the Craftsman and WEN options serve different battery and kit needs.
Is the Ryobi P321 right for your trim work?
The P321 is a good fit for light trim and small assembly tasks where an 18-gauge brad provides enough hold. It is a poor choice for work that calls for structural fasteners or stronger attachment than a thin brad can provide.
Typical brad-nailer jobs include attaching small decorative molding, fastening narrow trim and holding wood parts while glue sets. Suitability depends on the material, its thickness and the backing beneath it.
Brads leave small holes that take less filling than thicker finish nails. That benefit matters on visible trim, but it should never take priority over secure fastening.
Skip this type of nailer for framing, fences or other load-bearing connections that require specified fasteners. Our guide to what a framing nailer is used for explains that separate tool category.
For a broader starting point, see nail guns for home projects. If you already know you need a trim tool, what a brad nailer is used for gives more examples of suitable jobs.
Ryobi P321 buyers should start with the joint
Identify what the nail must hold and what it will enter before choosing the tool. A thin trim strip attached to solid wood is a different job from thick molding placed over drywall.
For glued assemblies, brads can help hold alignment while the adhesive cures. They do not replace clamps when clamping pressure is needed to close a joint.
For installed trim, follow the trim manufacturer's fastening guidance. If a heavier fastener is required, compare the job with a finish nailer before committing to an 18-gauge tool.
What comes with the P321, and what else do you need?
The P321 is a bare tool, so you need a compatible battery, charger and suitable brads before starting. Existing ONE+ users should check their exact battery and charger compatibility rather than assuming any battery marked 18V will fit.
| Detail | Ryobi P321 |
|---|---|
| Nailer type | 18-gauge brad nailer |
| Power | 18V lithium-ion battery |
| Tool weight | 6 lb |
| Package | Tool only |
| Battery and charger | Sold separately |
| Warranty | 30-day limited warranty |
If you are new to ONE+, compare the complete setup rather than the nailer alone. Include fasteners, eye protection and any clamps your project needs.
Ryobi gives this P321 a 30-day limited warranty. Confirm the applicable warranty and service arrangements before ordering, especially if warranty coverage is a deciding factor.
For comfort, think about the tool with your chosen battery attached. Reaching above a door or holding a nailer against vertical trim places different demands on your arm than working at a bench.
When is the P322 worth choosing instead?
Choose the P322 if you want tool-free depth adjustment, jam release and clearer placement aids for repeated trim work. Its brushless motor is another reason to choose it when you are comparing these 2 Ryobi models.
The P322 has an AccuDrive nose designed to improve the view of the nail placement area. An LED work light helps illuminate dim corners, and an air pressure speed dial works alongside the depth control.
These features suit buyers who move between different trim materials or need to place brads carefully near narrow edges. They give you specific reasons to choose the P322 beyond a higher model number.
Ryobi says the P322 can sink nails up to 2-1/8 in into hardwoods. Consider it if that length is needed, but still match the fastener to the joint and the manual's instructions.
The P322 weighs 6.3 lb and comes as a bare tool. Ryobi backs it with a 3-year warranty, which is a meaningful difference if coverage matters to your purchase.
Skip the P322 if you would be buying extra features without a clear use for them. For a focused comparison, read Ryobi P321 vs P322.
Who should choose Craftsman or WEN instead?
Choose Craftsman for an existing V20 setup or WEN for an included battery and charger. Switching brands makes the most sense when the complete setup better fits your needs.
Craftsman CMCN618B for V20 users
The Craftsman offers tool-free depth, jam and stall settings, plus a belt hook. It suits a V20 owner who wants a cordless trim tool without adding another charging system.
Its contoured over-molded handle is designed to support grip comfort. That can matter when moving around rooms, though you should still plan breaks and position the work to reduce awkward reaching.
Skip this bare tool if you have no compatible V20 equipment and no reason to join that platform. Compare it with a complete kit before adding separate power components.
WEN 20512 for a first cordless setup
The WEN includes a 2.0Ah battery, charger and 400 brads. It accepts brads from 3/4–2 in and has a 100-nail magazine, making its package and fastener range easy to assess before buying.
Its indicator tracks battery status, magazine fill and tool temperature. It also offers single-sequential and contact-activated firing modes, so read the operating instructions and understand the selected mode before use.
At 7.84 lb, weight is a reason to pause if your work involves frequent overhead reaching. The included nails also need to match your project; having nails in the box does not make them suitable for every trim thickness.
Browse our best cordless brad nailers for more alternatives. If you already have a compressor, compare best pneumatic brad nailers before adding a battery-powered tool.
What should you confirm before ordering a P321?
Confirm the approved nail lengths, operating controls and battery requirements before buying. Those details decide whether the P321 can handle the work you have planned.
Use this short checklist:
- Fastener fit: Check the approved gauge and length range in the manual.
- Material fit: Identify the trim thickness and the backing that will hold the nail.
- Controls: Confirm how depth adjustment, jam clearing and the firing mechanism work.
- Power setup: Check your exact battery and charger against the tool's requirements.
- Access: Think about corners, narrow strips and overhead positions where you will hold the tool.
Do not use voltage as a shortcut for driving ability. Battery labels alone do not tell you how a nailer will handle your chosen nail length and wood.
Avoid treating the P322's features as automatic P321 features. If a particular control is essential, confirm it for the exact model before ordering.
How do you set up a brad nailer for clean trim work?
Start with secured scrap that matches your trim and backing, then adjust according to the tool's manual. A practice shot into a different wood will not tell you enough about the finished joint.
Read the loading and adjustment instructions first. Remove the battery before loading, clearing a jam or making adjustments, following the model's procedure.
Choose an approved brad length that reaches suitable backing without extending into an unsafe area. Drywall thickness, trim thickness and the location of wires or pipes all affect that decision.
Hold the trim in place with clamps where practical. Keep your free hand clear of the nail path, including the far side where a brad could emerge.
Aim for a head set just below the surface when the material and finish call for it. A deeply buried head can crush thin trim, while a proud head can interfere with filling and finishing.
Change one setting at a time and check the result on scrap. See how to use a brad nailer for a fuller sequence.
Which common mistakes cause poor brad-nailer results?
The biggest mistakes are using the wrong fastener, missing solid backing and driving too close to an edge. More force cannot correct a joint that needs a different nail or better support.
A longer brad is not always safer or stronger. It may exit the workpiece or reach a hidden hazard, so select length for the actual attachment.
Very thin edges can split, and a brad can bend or follow the grain. Position the nail carefully and keep hands away from possible exit points.
Do not solve every proud nail by increasing the setting. First check the battery, fastener choice, contact position and material using the manual's guidance.
If the tool stops firing, stop pulling the trigger and inspect it safely. Our guide to why a brad nailer is not firing covers common checks without replacing the model-specific jam procedure.
How should you use and care for the P321 safely?
Use eye protection, a secured workpiece and a clear firing path every time. Keep the nailer pointed away from people and your finger off the trigger until you are ready to drive a nail.
Check for hidden services before fastening installed trim. Keep bystanders clear, and never use a hand behind the workpiece to catch or support the expected nail path.
Follow the manual's firing-mode instructions and never bypass a safety mechanism. For broader guidance, read how to use a nail gun safely and the NIOSH nail gun safety guide.
For care, remove the battery and keep the exterior, nose area and magazine free of debris using approved methods. Inspect for damage before use, and stop if the contact mechanism or trigger does not work normally.
Do not add oil, solvents or internal adjustments unless the manual directs you to do so. Follow its storage instructions for the nailer, battery and charger, and keep brads dry and undamaged.
Should you buy the Ryobi P321?
Buy the Ryobi P321 for compatible ONE+ ownership and suitable light trim work. Confirm its approved fasteners and controls, then choose it if it meets the job without requiring a different tool category.
Choose the P322 when its adjustment controls and placement aids have a clear role in your work. Choose Craftsman to stay with V20, or WEN when an included power setup is the better starting point.
If you are deciding between the 2 Ryobi models, use our Ryobi P321 vs P322 comparison to settle the feature trade-offs before ordering.
Frequently asked questions
Does the Ryobi P321 come with a battery and charger?
No, the Ryobi P321 is a tool-only model, so the battery and charger are sold separately; it makes the most sense if you already have compatible ONE+ equipment. If you are starting from scratch, compare the complete setup with a kit that includes both.
What kind of nails does the Ryobi P321 use?
The Ryobi P321 uses 18-gauge brad nails; check its manual for approved lengths and loading instructions before buying fasteners. Choose a length that passes through the trim and reaches suitable backing without creating an exit hazard; the longest nail is not automatically the right choice.
Should I choose the P322 if I want a brushless nailer?
Yes, choose the P322 if a brushless motor is a firm requirement; it also has tool-free depth adjustment, a tool-free jam release and an LED work light. Compare those controls with your actual trim work rather than deciding from the model number or score alone.
Can a brad nailer be used for baseboards?
A brad nailer can suit small, light baseboard trim when the material and fastening instructions allow it; thicker or heavier pieces may need a different fastener. Read our guide to using a brad nailer for baseboards and follow the trim manufacturer's guidance for nail size and placement.