Ryobi P321 vs P322 Brad Nailer: Which One? (October 2026)
For Ryobi P321 vs P322, choose the P321 if lower tool weight comes first. Choose the P322 for trim projects where its brushless motor, depth controls and nail-placement features are worth the extra weight.
On this page (10 sections)
- Ryobi P321 vs P322: what actually changes your choice?
- Who should buy the P321, and who should skip it?
- Who should buy the P322, and who should skip it?
- How much should runtime and brushless claims matter?
- What battery setup and handling checks come first?
- How should you set up either nailer for clean trim work?
- Which mistakes cause poor results with a cordless brad nailer?
- How should you care for either nailer between projects?
- Is the Craftsman CMCN618B a useful alternative?
- Which Ryobi brad nailer should you choose?
For Ryobi P321 vs P322, choose the P321 when lower tool weight is your priority, or the P322 when depth control and clear nail placement matter more. The P322 is the stronger feature-based choice for repeated trim projects; the P321 suits occasional work where its weight advantage matters most.
Both are cordless 18-gauge brad nailers in Ryobi's 18V ONE+ family. Your trim, battery setup and working position should guide the choice more than a model number.

Ryobi P321 vs P322: what actually changes your choice?
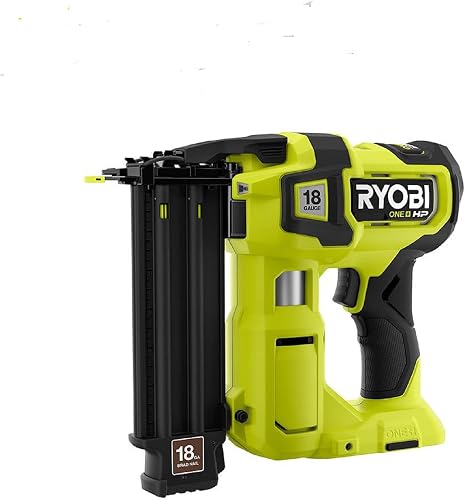
The P321 weighs less, while the P322 adds a brushless motor and controls that help with trim work. The P321 weighs 6 lb; the P322 weighs 6.3 lb.
That 0.3 lb difference gives the P321 a narrow weight advantage. It doesn't settle how either tool will feel with your chosen battery attached or while reaching around a cabinet.
The P322 has tool-free depth adjustment, an air pressure speed dial, a tool-free jam release latch and an LED light. Its AccuDrive nose is designed to improve the view of the nail position, including in tight spaces.
These features matter when you need to place brads on a narrow strip or keep nail heads at a consistent depth across a project. They give the P322 a clear reason to be on your shortlist beyond its brushless label.
P321 vs P322 for your next trim project
Pick the P321 for occasional repairs if you want cordless brad fastening and put lower weight first. Pick the P322 for a run of cabinet, window or door trim where placement and adjustment will be frequent parts of the job.
Don't infer that the P321 lacks every feature highlighted for the P322. If a particular control is essential, confirm how that control works on the exact model before choosing.
For help deciding whether either tool suits your material, read what a brad nailer is used for. Our brad nailer vs finish nailer comparison explains when a larger fastener is the better choice.
Who should buy the P321, and who should skip it?
The P321 suits occasional trim work when lower tool weight is your main buying reason. Think loose decorative molding, small trim repairs or short projects spread across different rooms.
A cordless brad nailer can make sense for these jobs because you can move between work areas without routing an air hose. Prepare and fit the pieces first so the fastening step stays short and controlled.
Choose the P321 around a real need for an 18-gauge nailer, rather than the appeal of adding another ONE+ tool. If most of your projects call for screws, larger nails or hidden pin holes, a brad nailer won't replace those methods.
Skip choosing the P321 solely because it is lighter if you regularly struggle to see the nail position. In that case, the P322's placement features deserve more weight in the decision.
The Ryobi P321 review gives you a closer look at this model. If you are starting a tool collection, our nail gun guide for home projects helps match the tool type to the work.
Who should buy the P322, and who should skip it?
The P322 suits buyers who expect repeated trim projects and want its depth controls and placement features. Cabinet trim, narrow molding and work inside recesses are practical reasons to consider it.
Ryobi says the P322 can sink nails up to 2-1/8 in into hardwoods. That capability is useful when your project needs a compatible longer brad, but the maximum length isn't the right choice for every joint.
Choose nail length around the trim thickness and the backing that must hold it. A longer nail can pass through thin backing or reach something hidden behind the work.
The P322 includes 2 non-marring pads and an operator's manual. A clean contact pad helps protect a finished surface, but grit trapped against the trim can still leave a mark.
Skip the P322 if you cannot name a feature you'll use often enough to justify replacing an existing tool. A motor change alone isn't a good reason to retire a nailer that already handles your projects.
Also skip either brad nailer for structural fastening. Framing connections and load-bearing work need the fasteners and tools specified for that construction.
How much should runtime and brushless claims matter?
Treat runtime as a planning factor, not the deciding number. Ryobi claims up to 2,250 nails per charge for the P322, but there is no matching P321 figure for a direct comparison.
Actual job planning should account for battery condition, nail length and material. For a large project, access to a charged spare can matter more than expecting the maximum claimed nail count.
Ryobi also claims 60% more nail-driving power than a brushed model. That comparison doesn't identify the P321, so it shouldn't be read as a measured P321-to-P322 advantage.
The practical question is how often your work demands longer brads or repeated fastening in harder material. For occasional light trim, fit, placement and correct depth remain more useful priorities than a power percentage.
Avoid comparing maximum nail counts across brands as if the batteries and working conditions were identical. Those figures can help describe a tool's intended use, but they don't guarantee a fair runtime ranking.
What battery setup and handling checks come first?
Check compatible batteries, charger access and working position before choosing either Ryobi. Both are tool-only models, so a new buyer needs more than the nailer to start work.
Existing ONE+ users have a reason to stay within that platform. Confirm compatibility in the manual rather than assuming any battery with a similar shape will work.
Consider the battery you'll actually use when judging balance. A larger pack can change how a cordless nailer feels, especially when you hold it away from your body.
For baseboard work, you may spend more time kneeling and changing position than holding the tool overhead. For upper trim, arrange a stable platform so you can see the contact point without stretching.
Don't let a cordless design encourage awkward reach. Move your support or reposition the work instead of firing from a position where you cannot control the tool.
If you're still choosing a platform, compare the DeWalt DCN680B brad nailer and our best cordless brad nailers. Our cordless vs pneumatic nailer guide helps if you already have a compressor.
How should you set up either nailer for clean trim work?
Start with approved brads and a scrap assembly made from the same trim and backing as your project. Correct setup helps prevent proud heads, deep dents and nails exiting an edge.
Read the manual before loading, and remove the battery during loading or adjustments as directed. Wear eye protection, keep bystanders clear and keep the muzzle pointed away from people.
Choose fasteners for the joint
Use only the nail gauge and length range approved for the tool. Then choose a length that passes through the trim and gets suitable purchase in sound backing without creating an exit hazard.
For wall trim, plan the fastening points around suitable backing and the location of hidden services. Don't assume a longer brad will solve weak support.
Thin trim, hardwood and layered assemblies can respond differently to the same setup. Use offcuts to check that the fastener holds the joint without splitting the edge or passing through the back.
Adjust depth before fastening the finished piece
Aim for a head position suitable for the finish, often just below the surface for painted trim that will be filled. An overly deep brad leaves a larger repair and may reduce its grip on thin material.
On the P322, follow the manual when setting the depth control and air pressure dial. Change one setting at a time so you can tell what changed the result.
Hold the contact point steadily against supported work. If heads remain proud, check the setup and battery before simply increasing every setting.
Keep hands clear of the nail path
Clamp small parts when practical and keep your free hand away from the possible nail path. Brads can bend or emerge from the side of wood.
Dry-fit joints before fastening, and use clamps to hold alignment. Don't use the nailer to force a poorly fitting miter together.
Our guide to using a brad nailer safely covers the basic workflow. Follow the model's manual for its controls and operating sequence.
Which mistakes cause poor results with a cordless brad nailer?
The common mistakes are wrong fastener length, poor backing and excessive drive depth. Changing from the P321 to the P322 won't correct a joint that is poorly supported or badly fitted.
Don't treat an 18-gauge brad as a substitute for a larger finish nail where the joint needs more holding strength. Brads suit light trim, but heavier molding and more demanding joints may call for a different approach.
For thicker stock and larger fasteners, start with our finish nailer guide. Choose the fastening method before choosing the tool model.
Another mistake is firing too close to a thin edge without checking an offcut first. Leave room for the fastener path and adjust the joint layout if the wood splits.
Don't repeatedly pull the trigger when the tool stops driving correctly. Keep it pointed safely, remove the battery and follow the manual's steps to identify the cause.
A jam, an empty magazine and a battery issue need different responses. Our brad nailer not firing guide helps you work through common causes without guessing.
How should you care for either nailer between projects?
Keep the nose, magazine and contact surfaces clean, and store the tool dry. Small amounts of debris can interfere with feeding or mark trim that is ready for paint or finish.
Remove the battery before inspecting the nose or clearing a jam. A tool-free release makes access easier, but it doesn't remove the need to isolate the power source.
Follow the manual's cleaning and lubrication instructions. Don't add oil simply because a pneumatic nailer uses it, and don't use solvents on pads or plastic parts unless approved.
Before each project, check for damaged brad strips, loose parts and worn contact pads. Set aside bent or corroded fasteners instead of loading them.
Store batteries and the charger according to their instructions. Before returning to a long project, check the charge and make a few practice shots in scrap to confirm the setup.
Is the Craftsman CMCN618B a useful alternative?
The Craftsman CMCN618B makes sense for existing V20 users who want a cordless brad nailer without adding another battery system. Its battery and charger are sold separately.
It has a tool-free depth setting, tool-free jam and stall settings, a belt hook and a contoured over-molded handle. Those are practical features for adjusting the tool and setting it aside between pieces.
Craftsman claims up to 420 nails per charge. Don't rank it against the P322 on that number alone, since a fair comparison needs matching batteries, fasteners and materials.
Choose the Craftsman because it fits your tools and trim needs. If you already have compatible ONE+ batteries, switching platforms needs a stronger reason than a different brand name.
Which Ryobi brad nailer should you choose?
For Ryobi P321 vs P322, choose the P321 when lower weight is the reason you'll use it more comfortably. Choose the P322 when its placement features and adjustments address the trim work you have planned.
If you already own a capable brad nailer, identify the task it cannot handle before replacing it. If you are buying your first, sort out nail size, backing and battery needs before ordering.
Read the Ryobi P321 review for more detail on the lighter option, or browse the brad nailers category to compare other tools for your next project.
Frequently asked questions
What is the difference between the Ryobi P321 and P322?
The P321 is lighter, while the P322 has a brushless motor and features aimed at depth control and nail placement. The P321 weighs 6 lb and the P322 weighs 6.3 lb; the P322 includes an AccuDrive nose, LED light, tool-free depth adjustment and jam release.
Can the Ryobi P321 and P322 use the same battery?
Both tools belong to Ryobi's 18V ONE+ platform and can share a compatible ONE+ battery; confirm the approved battery models in each tool's manual before use. Both are tool-only options, so include a compatible charger in your setup if you don't already have one.
Which Ryobi brad nailer is lighter?
The P321 is lighter by 0.3 lb: it weighs 6 lb, compared with the P322's 6.3 lb. Consider the battery you plan to attach as well as the tool's balance; for raised trim, comfortable reach and a stable work position also affect fatigue.
Does the Ryobi P322 include a battery and charger?
No, the P322 is a tool-only model, so you'll need a compatible battery and charger; it includes 2 non-marring pads and an operator's manual. If you're new to the ONE+ platform, plan the complete setup before starting your project so the tool is ready to use.
Is the P322 worth choosing over the P321?
Choose the P322 when its depth controls, nail-placement features and brushless motor solve needs in your trim work; choose the P321 when lower weight is your main priority. If you already have a suitable brad nailer, identify a specific limitation before replacing it with either model.