How to Use a Nail Gun Safely
Here's how to use a nail gun safely: match the tool and nails to the job, wear eye and hearing protection, secure the work, and use full sequential firing when available. Keep hands clear of the nail path and disconnect power before loading, clearing jams, or making adjustments.
On this page (9 sections)
- Which nail gun should you choose for your project?
- What should you check before connecting power?
- How do you use a nail gun safely, step by step?
- How should you hold and position the nail gun?
- How do you set up an air-powered nail gun?
- What should you do if the nail gun jams or misfires?
- Which common mistakes should you avoid?
- How should you clean and store a nail gun?
- Which nailer should you choose before your next job?
Here's how to use a nail gun safely: choose the correct nailer and fasteners, secure the work, wear eye and hearing protection, and use full sequential firing when available. Keep your free hand clear of the nail path and disconnect power before loading, clearing jams, or making adjustments.
Start with the fastening task. Small trim, heavier molding, and structural framing need different nails, and extra driving power won't make the wrong fastener suitable.
Which nail gun should you choose for your project?
Choose by the joint and material first, then by power source. Brad nailers suit light trim, finish nailers suit heavier finish work, and framing nailers handle larger construction fasteners.
Our complete guide to nail guns for home projects explains those tool classes. If you're choosing trim fasteners, start with what gauge nailer you need.
How should beginners choose a nail gun to use?
Buy for the work you expect to repeat, rather than one tool for every task. Check nail gauge, length, collation, and head requirements before choosing a model.
For structural work, follow the building plans and applicable fastening requirements. A nail fitting the magazine doesn't mean it's approved for that connection.
A cordless tool suits short jobs spread across several rooms. Pneumatic tools suit buyers willing to manage a compressor and hose; our cordless versus pneumatic nailer comparison explains the setup tradeoffs.
DeWalt DCN680B: for light trim without an air hose
Choose the DCN680B for decorative trim and room-to-room work. It runs on a compatible DeWalt 20V MAX battery and drives brads from 5/8 to 2-1/8 in.
This is the tool-only version, so account for a compatible battery and charger. Its micro nose helps you see the placement point, while tool-free jam release and a stall-release lever provide separate ways to address those stoppages.
Skip it for framing or joints that need larger finish nails. Its low-nail lockout helps prevent dry firing, but it doesn't replace checking the magazine before starting a run.
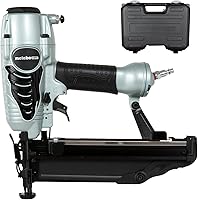
Metabo HPT NT65M2S: for heavier finish work
Choose the NT65M2S for trim that needs a larger fastener than a brad. It accepts 16 gauge finish nails from 1 to 2-1/2 in and weighs 3.7 lb.
The no-mar tip protects the work surface, and its adjustable exhaust lets you direct discharged air away from your face. Those features suit visible molding and cabinetry work where placement and surface marks matter.
Skip it if you want to avoid an air setup or your delicate trim calls for a smaller fastener. Larger nails leave larger holes to fill, so don't move up a gauge without a reason.
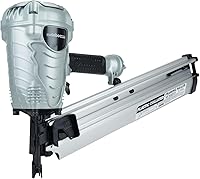
Metabo HPT NR90AES1: for framing and sheathing
Choose the NR90AES1 for construction work that calls for framing nails. It accepts 21 degree plastic-collated nails from 2 to 3-1/2 in and weighs 7.5 lb.
Its tool-free depth adjustment helps set nails flush or countersunk as the task requires. A selective actuation switch offers sequential and contact modes; identify the exact trigger sequence in the manual before use.
Skip it for decorative trim, where its fasteners are too large. Our guide to choosing a framing nailer covers the decisions that matter before starting structural work.
What should you check before connecting power?
Inspect the tool, fasteners, and work area while the nailer is disconnected. Read the manual for its loading order, trigger system, operating limits, and maintenance requirements.
Check the housing, magazine, nose, trigger, and workpiece contact for damage or sticking. Don't use a tool with a faulty contact mechanism, loose connection, or damaged hose or battery.
Wear safety glasses and hearing protection, and keep other people clear. Check both sides of the work for wires, pipes, existing fasteners, and anything else a nail could strike.
Choose nail length for the full material stack and required holding depth. Avoid a fastener long enough to emerge through the back or enter a hidden service.
Clamp small or loose pieces before connecting power. Never use your free hand behind the intended nail exit point to support the work.
How do you use a nail gun safely, step by step?
Set up on secured scrap, check the result, and drive one deliberate nail at a time. Use scrap of the same material and thickness as the job.
- Load while disconnected. Follow the manual's magazine and follower steps, using only approved fasteners.
- Select the firing mode. Choose full sequential operation when available and confirm how it resets.
- Connect the correct power source. Keep your finger off the trigger and the muzzle pointed away from people.
- Position the nose. Hold the tool as directed, with your hand and body clear of possible nail travel.
- Drive one nail. Follow the contact-and-trigger sequence and allow room for recoil.
- Inspect placement and depth. Disconnect before adjusting, then reconnect and check another spot on the scrap.
Full sequential firing requires a set order for each shot. Contact firing creates a greater risk of an unintended nail, including a second shot if recoil brings the nose back against the work while the trigger remains held.
Our guide to using a brad nailer covers trim-specific placement. For tool selection, use our brad nailer versus finish nailer comparison.
How deep should you drive the nail?
Set depth for the fastening task, rather than driving every nail as deep as possible. Finish nails commonly need a slight recess for filler, while structural connections may require a flush head.
All 3 nailers above have tool-free depth adjustment. Disconnect power before changing the setting, and check the result again when material thickness or hardness changes.
A proud nail can snag or prevent parts from seating. Excess depth can crush the surface, enlarge the repair, or reduce the holding ability of the connection.
How should you hold and position the nail gun?
Grip the handle firmly, maintain stable footing, and keep your free hand outside the possible nail path. Clamps should hold small pieces where your hand would otherwise be close to the nose.
Check the angle before each shot. A nail can exit through an edge or deflect after striking a knot, hard surface, or another fastener.
Don't crowd the edge of narrow trim or assume the nail will follow a perfectly straight path. Reposition the work when you can't see the placement point or maintain control.
Take your finger off the trigger whenever you move. Don't carry the tool by its hose, climb with it ready to fire, or leave it connected and unattended.
How do you set up an air-powered nail gun?
Match the compressor, regulator, hose, and fittings to the nailer's manual. Use the specified operating range and never exceed the maximum pressure.
Check hose condition and route it away from walkways, sharp edges, and snag points. Follow the connection sequence with your finger off the trigger.
If nails remain proud, stop and check depth, fastener choice, and air supply before increasing pressure. More pressure isn't a substitute for finding the cause.
For jobs where an air setup is impractical, read can you use a nail gun without an air compressor?.
What should you do if the nail gun jams or misfires?
Stop firing and disconnect power before investigating. Remove the battery or disconnect the air hose, then follow the manual's unloading and jam-release instructions.
Keep fingers away from the driver and muzzle because trapped parts can remain under force. Never look down the nose or assume that disconnecting power has released a jam.
Check for damaged or incompatible nails before reloading. If misfires continue or the mechanism won't reset, stop using the tool and seek qualified repair.
Our guide to troubleshooting a brad nailer that won't fire explains the next checks. Repeated trigger pulls can turn a simple stoppage into a larger jam.
Which common mistakes should you avoid?
Don't rush placement, substitute fasteners, or bypass a safety mechanism. Most avoidable errors begin before the trigger pull.
- Holding thin material by hand: clamp it so a deflected nail can't reach your fingers.
- Firing without checking behind the work: account for the nail's full length and possible exit path.
- Changing materials without checking depth: a setting suitable for one board may overdrive into another.
- Using contact firing to work faster: choose full sequential firing when available.
- Continuing after an odd shot: stop if a nail bends, exits unexpectedly, or fails to seat.
OSHA's nail gun safety guidance explains injury risks and safer work practices. Follow your manual and workplace requirements throughout the job.
How should you clean and store a nail gun?
Disconnect power, unload as directed, and clean only by the method in the manual. Remove loose debris from accessible areas without putting fingers into the driver path.
Follow the model's lubrication instructions. Don't add oil simply because another pneumatic nailer requires it, and don't spray cleaners into mechanisms without approval in the manual.
Inspect the nose, magazine, and connections before storage. Keep the tool and fasteners dry and secured away from children, and store hoses where they won't be crushed.
Which nailer should you choose before your next job?
Choose the DCN680B for light cordless trim work, the NT65M2S for heavier finish trim, or the NR90AES1 for framing tasks. Skip any model whose fasteners don't suit the joint.
Learning how to use a nail gun starts with that match, followed by secure workholding and controlled firing. If your next project is trim, compare brad and finish nailers before choosing the tool.
Frequently asked questions
What is the safest way to use a nail gun?
Use full sequential firing when available, wear eye and hearing protection, and secure the work before connecting power. Keep your free hand away from the nail path, including behind the workpiece.
Follow the manual's firing sequence and disconnect power before loading, clearing jams, or making adjustments.
Should I use sequential or contact firing?
Choose full sequential firing when available because it reduces unintended firing compared with contact firing. It requires the nose contact and trigger to operate in a set order for each nail.
Confirm the trigger system in your manual; a selectable switch alone doesn't explain how the mechanism resets between shots.
How do I clear a nail gun jam safely?
Disconnect the air hose or remove the battery, then follow the manual's unloading and jam-release steps. A trapped fastener or driver can remain under force after power is removed.
Keep the muzzle pointed away from people, keep fingers clear of the driver, and never look down the nose.
Can a nail gun fire without touching the wood?
A nail gun's contact tip cannot identify wood; another object or a person can also press it. Depending on the trigger system, pressing the contact tip and trigger can fire a nail.
Never bypass the contact mechanism, point the tool at anyone, or carry it with your finger on the trigger.