What Is a Finish Nailer Used For?
A finish nailer is a tool that drives 15- or 16-gauge finish nails into trim and woodwork. Choose it for baseboards, molding, casings, and cabinet trim that need more holding power than thin brads provide.
On this page (7 sections)
- What is a finish nailer used for?
- How does a finish nailer differ from a brad or pin nailer?
- Which finish nailer suits your work?
- How do you choose nail length and set driving depth?
- How do you set up and use a finish nailer safely?
- What mistakes damage trim or cause feeding problems?
- What finish nailer should you choose?
A finish nailer is a tool that drives 15- or 16-gauge finish nails into trim and woodwork. It suits baseboards, molding, door and window casing, and cabinet trim that need more holding power than thin brads provide.
The tradeoff is a larger hole to fill and a greater chance of splitting delicate pieces. Choose one around your trim, the backing behind it, and how often you'll move between work areas.
What is a finish nailer used for?
A finish nailer attaches trim that needs a firm hold while leaving a small head that can be recessed and filled. Typical jobs include baseboards, crown molding, chair rails, casings, and cabinet trim.
It helps hold a fitted piece in place, but it won't correct a poor joint or pull badly bowed trim flat. Fit and support the work before fastening.
Some finish nailers also suit exterior trim and decorative stair parts. Those jobs need the correct fastener material and fastening method, especially where moisture, treated wood, or building requirements affect the choice.
What is a finish nailer used for on baseboards?
A finish nailer secures baseboards through the wall covering into suitable backing. Find the framing and check for hidden wires or pipes before choosing nail positions and lengths.
Don't assume a longer nail always gives a better result. Excess length can reach hidden services or emerge where you don't expect it.
Our guide to nail guns for baseboards and trim helps match tools to that job. For thin trim or small shoe molding, see what a brad nailer is used for.
Can you use a finish nailer for cabinets?
A finish nailer can attach cabinet molding, face trim, and decorative pieces when the material can accept the nail. Support the parts so the nail doesn't shift them as it enters.
Cabinet assembly and wall mounting may require screws, joinery, or other specified hardware. Finish nails don't replace those connections.
How does a finish nailer differ from a brad or pin nailer?
A finish nailer uses thicker fasteners for greater holding power, while brad and pin nailers leave smaller holes. The right choice balances the hold you need against the marks and splitting risk the wood can tolerate.
An 18-gauge brad nailer suits lighter trim and narrow pieces. A pin nailer uses much finer, often headless fasteners for delicate work or holding small parts while glue cures.
For heavier trim, choose a finish nailer when the backing and material can support the fastener. For fragile edges, don't use extra nail thickness as a substitute for a suitable joint.
Read brad nailer vs finish nailer for a closer comparison. The guide to what a pin nailer is used for explains where smaller fasteners help.
Should you choose 15-gauge or 16-gauge nails?
Choose 15 gauge for heavier trim and 16 gauge for general trim with smaller holes, subject to the project's fastening needs. A lower gauge number means a thicker nail.
Magazine shape is a separate consideration: an angled magazine can give you more room around corners. It doesn't mean you should tilt the nail into an unsafe path to reach a difficult spot.
Check the exact nail style as well as gauge. Two packs of finish nails aren't interchangeable just because their lengths match.
Which finish nailer suits your work?
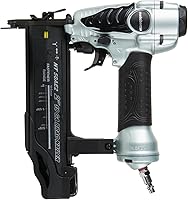
Choose the Metabo HPT NT65M2S for general trim with an air setup, the NT65MA4 for heavier trim and corner access, or the Ryobi P326 for cordless convenience. Each serves a different work pattern.
Metabo HPT NT65M2S: general trim with a compressor
The NT65M2S suits molding, chair rail, and cabinet trim when you already have a suitable compressor or plan to use one regularly. It accepts 16-gauge finish nails from 1 to 2 1/2 in and weighs 3.7 lb.
Its tool-free depth adjustment helps set nail heads for filling, while the no-mar tip helps protect the surface from nose marks. The adjustable exhaust lets you direct discharged air away from your face and work.
Skip it if you mainly make small repairs in different rooms and don't want to move a compressor and hose. Very thin decorative strips may also call for a finer fastener.
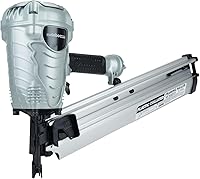
Metabo HPT NT65MA4: heavier trim and tight corners
The NT65MA4 suits crown molding, larger baseboards, and casings where thicker fasteners and magazine clearance matter. It accepts 15-gauge angled DA nails from 1 1/4 to 2 1/2 in and weighs 4.2 lb.
The angled magazine helps with placement in tight corners. Tool-free depth adjustment and an integrated air duster help with setting heads and clearing loose debris from the work surface.
Skip it for delicate strips or projects where minimizing filled holes matters most. It also makes less sense if your planned jobs specifically call for 16-gauge fasteners.
Ryobi P326: trim work without an air hose
The P326 suits room-to-room repairs and trim work where moving freely matters more than keeping tool weight low. Its 18V ONE+ AirStrike system needs no compressor, hose, or gas cartridge.
This cordless 16-gauge model has tool-free depth adjustment and can drive nails up to 2 1/2 in. At 7.15 lb, it's heavier than either pneumatic option here, which matters during overhead work.
The P326 is a bare tool, so you'll need a compatible battery and charger. Skip it if low tool weight is your priority or your work calls for thicker angled fasteners.
Compare alternatives in our guide to cordless finish nailers. For the wider setup tradeoffs, read cordless vs pneumatic nailers.
How do you choose nail length and set driving depth?
Choose nail length from the trim thickness, any material behind it, and the backing you need to reach. Wall covering takes up nail length without providing the same grip as sound wood.
Follow the project's fastening instructions rather than using one nail length for every job. For exterior work, choose fasteners whose corrosion resistance suits the exposure and materials.
Driving depth controls the head position, not how much nail reaches the backing. Aim for a head slightly below the surface when the finish calls for filling, without crushing the wood around it.
Use matching scrap with similar backing to set depth before fastening visible trim. A setting that works in softwood may leave proud heads or deeper marks in another material.
If you're still choosing a fastener size, see what gauge nailer you need.
How do you set up and use a finish nailer safely?
Start with compatible fasteners, a supported workpiece, and the manual's setup sequence. Wear eye protection and use hearing protection as the tool and work area require.
- Isolate the tool from its power source before loading or adjusting it as directed.
- Check that the magazine contains the correct gauge, style, and length.
- For pneumatic tools, use the specified air pressure and a suitable hose connection.
- Select sequential firing where available for deliberate placement.
- Make a few trial drives in matching scrap, then adjust depth.
- Hold the nose firmly against the work and keep your free hand outside the possible nail path.
Both Metabo models offer selectable firing modes. Sequential operation is the sensible starting point for careful trim placement; learn the controls before connecting power.
Keep your finger off the trigger while moving or positioning the tool. Nails can deflect through an edge, so a hand behind the workpiece is still at risk.
Read how to use a nail gun safely before starting your first project.
What mistakes damage trim or cause feeding problems?
The most common mistakes are wrong nails, excessive depth, and poor workpiece support. Fix the cause rather than repeatedly driving more nails into the same area.
- Using maximum length everywhere: Choose enough reach for the intended backing without needless excess.
- Nailing too close to an edge: Reposition the fastener or use a finer one if the piece is prone to splitting.
- Overdriving the head: Reduce depth before the nose or nail crushes the surface.
- Fastening a loose joint: Clamp or hold the fitted pieces securely before driving.
- Mixing nail styles: Load only fasteners the manual allows, even if another strip seems to fit.
If a nail stops short, don't fire another into the same hole. Isolate power and address the proud fastener with a suitable manual method.
Keep the nose and magazine clear of debris, and inspect the hose, connections, or battery for damage. Follow the manual's lubrication instructions, since oil requirements vary between tools.
Remove fasteners and isolate power before storage as directed. Store the tool dry, and inspect a damaged no-mar tip before using it on visible trim.
What finish nailer should you choose?
Knowing what a finish nailer is used for helps you buy around the work ahead. Start with your trim and required fastener, then choose the power setup you'll use comfortably.
Pick the NT65M2S for general trim with a compressor, the NT65MA4 for heavier trim and tight-corner access, or the P326 for cordless work across several locations. Choose a brad or pin nailer when the piece is too delicate for finish nails.
Compare more options in our guide to finish nailers. If your plans also include framing or other larger jobs, use the complete guide to nail guns for home projects to choose the right tool for each task.
Frequently asked questions
What is a finish nailer used for?
A finish nailer attaches baseboards, crown molding, door and window casing, chair rails, and cabinet trim using nails thicker than brads.
It suits pieces that need a firm hold, but the nail holes usually need filling, and structural connections still require the fasteners or joinery specified for the project.
Is a finish nailer stronger than a brad nailer?
A finish nailer generally provides more holding power because finish nails are thicker than brads, though the wood, nail length, and joint also affect the result.
Choose it for heavier trim; use a brad nailer when a smaller hole and less risk of splitting matter more.
Can you use a finish nailer for baseboards?
Yes, a finish nailer can attach baseboards when the nails reach suitable backing and match the trim material.
Account for both the baseboard and wall covering when choosing length, locate hidden services before fastening, and adjust depth on matching scrap so the head sits slightly below the surface without crushing it.
What is the difference between 15-gauge and 16-gauge finish nailers?
A 15-gauge finish nail is thicker and generally suits heavier trim, while a 16-gauge nail leaves a smaller hole and works for many everyday trim jobs.
The tools require their specified nail gauge, collation style, and length, so choosing between them also means choosing the fasteners you'll keep on hand.