DeWalt DWFP12231 Pneumatic Brad Nailer Review: Worth It? (October 2026)
The DeWalt DWFP12231 suits careful trim and molding work if you have a compatible compressor. Choose its sequential trigger for individual nail placement; consider the alternatives for longer brads, confined access or selectable firing.
On this page (9 sections)
- What does the DeWalt DWFP12231 offer?
- Who should buy this pneumatic brad nailer?
- How do you choose the right brad for the job?
- What should you check before connecting the compressor?
- Which alternative should you choose instead?
- Is the DWFP12231 right for baseboards and molding?
- Which mistakes spoil trim work?
- How should you care for the DWFP12231?
- Should you buy the DeWalt DWFP12231?
The DeWalt DWFP12231 suits trim and molding work if you have a compatible compressor and want to place each nail individually. Its depth control, accessible jam release and protective nose tip address practical needs when fastening visible woodwork.
Choose it for decorative molding, casing and shoe molding when brads suit the joint. Skip it if your main need is hose-free movement, structural fastening or greater holding strength than an 18-gauge brad can provide.
What does the DeWalt DWFP12231 offer?
The DWFP12231 gives you adjustable nail depth and tool-free jam access in a pneumatic trim nailer. It drives 18-gauge brads from 5/8 to 2 in long and uses a sequential-style trigger.
DeWalt DWFP12231 Pneumatic Brad Nailer Kit
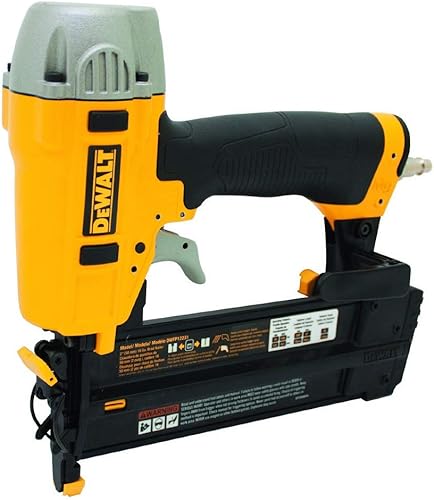
- 18-gauge nails from 5/8 to 2 in
- Tool-free depth adjustment
- Tool-free jam release
- Sequential trigger
Choose this kit for trim jobs where you place each nail separately. Its depth control helps set nail heads, while the removable nose tip helps protect finished surfaces.
Pros
- Depth adjustment has detents
- Tool-free access for jam removal
- Non-marring nose tip with on-tool storage
- Carrying case included
Cons
- Requires a compressor and hose
- No selectable contact firing
- Does not accept brads longer than 2 in
The kit includes a carrying case, a 1/4 in fitting and an owner's manual. The tool weighs 2.65 lb, has an integrated rubber grip and includes an adjustable belt hook.
DeWalt describes its motor as maintenance-free and designed to help prevent stains on the work surface. The rear exhaust directs exhaust away from the work, while the removable non-marring nose tip has on-tool storage.
Where does the DeWalt DWFP12231 help most?
The depth dial with detents matters when a visible nail head needs a small correction. You can adjust the setting without hunting for a separate tool, then check the result on matching scrap.
The nose tip is useful on painted or finished trim, where a contact mark can add repair work. Keep it clean because a protective tip can still press trapped grit into a surface.
The sequential trigger suits careful placement around casing edges, narrow molding and short trim returns. Keep your finger off the trigger while moving between fastening points, even when working slowly.
Who should buy this pneumatic brad nailer?
Buy the DWFP12231 if you have a suitable air setup and recurring light trim jobs. It makes sense for someone who can leave a compressor nearby and move along a planned run of molding.
A workshop user who already uses air tools has less setup to add than a homeowner starting with no compressor or hose. Count those supporting items when deciding which tool system fits your projects.
For a single loose piece of trim, setting up air equipment may take more effort than the repair itself. For a room of shoe molding, that setup serves many fastening points.
Skip this model if you regularly move between scattered repairs and want to avoid routing a hose. Our guide to cordless nail guns explains what to consider before choosing a battery-powered tool.
Also skip it for framing, structural connections or joints that need substantial withdrawal resistance. An 18-gauge brad leaves a small hole, but its small head offers less holding power than a heavier finish nail.
How do you choose the right brad for the job?
Choose a brad that passes through the trim and reaches sound backing, without extending into a space where it could cause damage. Trim thickness alone does not tell you the right length.
Account for gaps, drywall or other layers between the molding and the wood you intend to fasten into. A nail that barely enters solid backing may leave the trim loose even when its head looks properly seated.
Avoid choosing the longest nail by default. Thin panels, cabinet interiors and hidden plumbing or wiring can make excess length a problem.
Brads often work well for small moldings and for holding suitable glued parts in position while the adhesive cures. They do not correct a poor-fitting joint or replace clamps where the assembly needs pressure.
For thicker trim, a bowed board or a piece that must resist pulling away, consider a heavier fastener. Our brad nailer vs finish nailer guide explains that choice before you commit to a tool.
What should you check before connecting the compressor?
Confirm pressure, air supply and connection compatibility in the DWFP12231 manual before connecting it. Do not borrow another nailer's pressure settings simply because both tools use brads.
Check that the hose coupling matches the fitting and that the hose can reach the work without pulling tight. A fitting's size alone does not confirm that every coupling style will connect.
Route the hose behind your working path, clear of ladders, sharp edges and finished surfaces. Leave enough slack to position the nose without fighting the hose.
Keep the tool disconnected while inspecting it and loading fasteners, following the manual's sequence. Wear suitable eye and hearing protection, and keep everyone clear of the discharge area.
Our nail gun safety guide covers handling precautions. For the full working sequence, follow how to use a brad nailer.
Set depth on matching scrap first
Use scrap with the same trim material and backing as the job. A setting that works in soft molding may leave a different result in denser wood.
Start within the manual's recommended air settings, then follow its depth-adjustment procedure. Make small changes until the head sits where the finish requires it, without leaving a deep crater.
If nails remain proud, check the air supply and setup rather than turning pressure upward without limit. Stop if the tool behaves irregularly or cannot seat fasteners within its approved operating range.
Which alternative should you choose instead?
Choose an alternative when a specific job requirement makes its features more useful than the DeWalt's. The strongest reasons here are firing-mode choice, nose access and slightly longer brad compatibility.
All four tools require an air supply, so switching between them will not solve a hose-management problem. Their differences matter most once you know a pneumatic brad nailer fits your work.
Bostitch BTFP12233: for varied trim jobs
Choose the Bostitch if your work calls for brads up to 2-1/8 in or selectable sequential and contact operation. Its Smart Point design uses a smaller nose than current Bostitch nailers and does not require compressing the contact trip to actuate the tool.
It also has Dial-A-Depth control, tool-free jam release and oil-free operation. The kit includes a carrying case, an air fitting and extra no-mar tips.
Skip the Bostitch upgrade if you plan to place every nail separately and your chosen fasteners already fit the DeWalt. The extra length does not turn it into a finish nailer or solve a joint that needs a larger nail head.
Use our Bostitch vs DeWalt pneumatic brad nailer comparison if these are your final two choices.
Makita AF506: for confined trim work
Choose the Makita when nose access is your main concern. Its narrow nose helps you reach confined areas, while the built-in air duster clears loose debris from the work surface.
The AF506 also has a tool-less depth dial and an exhaust port that rotates to direct air away. Its kit includes a case, air fitting, two no-mar tips, safety glasses and pneumatic nailer oil.
Skip it if you mainly fasten open runs of molding and have no particular need for the duster or narrow nose. It shares the DeWalt's maximum nail length, so it does not expand your fastener choice.
The included oil is also a reminder to follow this model's own care instructions. Do not apply the DeWalt's maintenance-free motor guidance to a different tool.
Metabo HPT NT50A5: for repeated installation work
Choose the Metabo HPT if firing-mode choice and reload checks would help your workflow. It offers selectable bump or sequential firing, a reload indicator and an integrated air duster.
Its narrow nose and short center height help with access around corners. The belt hook can mount on the left or right side, which gives you a choice of carrying position.
Skip it if you will use only sequential firing and do not need its additional controls. A reload indicator helps you notice a low magazine, but you still need to check fasteners when a nail fails to drive.
Is the DWFP12231 right for baseboards and molding?
The DWFP12231 fits small decorative molding and suitable trim joints, but baseboard suitability depends on the material, backing and holding strength required. DeWalt identifies casing, shoe molding and kitchen crown among this model's uses.
Do not expect brads to pull a badly bowed board flat against a wall. Fit the trim first, locate solid backing and choose fasteners that can hold the piece without relying on excessive nail depth.
For broad or heavy baseboards, decide whether a finish nail is more appropriate. Our guide to using a brad nailer for baseboards explains where brads fit and where a different fastener makes sense.
For smaller projects, what a brad nailer is used for helps separate suitable trim tasks from jobs that need another tool.
Which mistakes spoil trim work?
The most avoidable mistakes are wrong fastener choice, poor nose placement and excessive depth. Correct those before trying to work faster.
- Driving near an unsupported edge: Thin wood can split, and a brad can leave the side of a piece. Check the nail path and keep your supporting hand well away.
- Using nails to close a poor joint: Cut and fit the parts properly first. Fasteners should hold the fit rather than force it.
- Setting heads too deep: A deep hole adds filling work and can crush delicate trim. Adjust depth on scrap before fastening the visible piece.
- Dragging the nose across finished wood: Lift and reposition the tool. Check for grit on the protective tip before moving to the next area.
- Continuing after a misfire: Stop and disconnect the air supply before investigating. Check the magazine, fasteners and nose using the manual's procedure.
- Rushing into a corner: Confirm that both the tool angle and fastener path are safe. A nose that fits into a gap does not guarantee a safe place to drive a nail.
For consistent results, plan fastening points before starting a long run. This helps you find backing and avoid placing nails wherever the hose happens to let the tool rest.
How should you care for the DWFP12231?
Keep the nose, magazine and air connection clean, and follow DeWalt's maintenance instructions. A maintenance-free motor does not remove the need to inspect the rest of the tool.
Do not add oil out of habit. Follow the model's instructions for lubrication and cleaning rather than copying a routine from another pneumatic nailer.
Disconnect the air supply before clearing jams or removing debris. Use the jam-release mechanism as directed, and avoid forcing bent fasteners through the nose.
Inspect the removable tip for dirt or damage, and check the hose and connection for wear. Store the nailer dry in its carrying case, with fasteners managed according to the manual.
If a problem repeats, stop using the tool until you identify the cause. Repeated jams or inconsistent firing call for a setup check or service, rather than continued firing at visible trim.
Should you buy the DeWalt DWFP12231?
Choose the DeWalt DWFP12231 for careful trim placement when you already have suitable air equipment and your joint calls for 18-gauge brads. Its controls address common trim tasks without requiring a choice of firing modes.
Choose Bostitch when longer brad compatibility or contact operation matters, Makita when confined access leads the decision, or Metabo HPT when selectable firing and a reload indicator suit repeated work.
Before ordering, settle the fastener size your project needs and confirm your compressor setup. Then use our best pneumatic brad nailers guide to compare other options that meet those requirements.
Frequently asked questions
What size nails does the DeWalt DWFP12231 use?
The DWFP12231 uses 18-gauge brad nails from 5/8 to 2 in long; choose the length for the trim thickness and sound backing behind it, while allowing for hidden services or thin panels. A longer brad is not a substitute for the heavier fastener a demanding joint may need.
Does the DeWalt DWFP12231 need an air compressor?
Yes, the DWFP12231 needs a compatible air compressor and hose; the kit includes a 1/4 in fitting, but that does not confirm that every hose coupling will match. Check the manual's operating pressure and air supply requirements, then confirm your compressor, hose and connections meet them.
Can you adjust nail depth on the DWFP12231?
Yes, the DWFP12231 has a tool-free depth adjustment with detents; set it using the manual's procedure, then check nail placement on scrap that matches your trim and backing. Aim for the intended head depth without crushing the surface, and recheck whenever the material or fastener length changes.
How does the DWFP12231 compare with the Bostitch BTFP12233?
Choose the DeWalt for individual nail placement with its sequential trigger; the Bostitch adds selectable sequential or contact operation, a Smart Point nose and compatibility with brads up to 2-1/8 in. Those differences matter when your work calls for another firing mode or slightly longer fasteners.


