Nail Guns for Home Projects: The Complete Guide
Choose a nail gun by the fastener your project needs: framing nails for compatible construction work, finish nails for heavier trim, or brads for lighter molding. Then choose battery or air power to suit your workspace and existing equipment.
On this page (11 sections)
- What does a nail gun do?
- Which nail gun is right for your project?
- How do you choose the right nail size and gauge?
- Should you choose a cordless or pneumatic nail gun?
- What should you check before buying a nail gun?
- How do you set up a nail gun before the first nail?
- What firing mode should you use?
- How do you use a nail gun safely?
- Which nail gun mistakes cause poor results?
- How do you maintain and store a nail gun?
- Which nail gun should you choose for a home project?
The right nail gun matches the fastener your project needs: framing nails for compatible construction work, finish nails for heavier trim, or brads for light molding. Choose the nail type before deciding between battery and air power.
For a few pieces of shoe molding, a brad nailer is the useful starting point. For construction work, follow the required nail size and fastening schedule rather than choosing by convenience.
This guide covers tool choice, complete setup, careful fastening and routine care. Read how to use a nail gun safely before your first project.
What does a nail gun do?
A nail gun drives compatible nails into material using battery power or compressed air, depending on the tool. Its main benefit is repeated fastening without swinging a hammer at every nail.
That can help when you're holding molding in position or placing many fasteners across a construction project. It also introduces risks from unintended firing, hidden obstacles and nails that bend or exit the work.
A nailer handles the driving step, but it doesn't choose a sound joint. The material, backing, fastener and spacing still need to suit the job.
For structural work, plans and applicable building requirements control the fastening method. Some joints require screws, bolts or approved connectors, so owning a framing nailer doesn't make nails suitable everywhere.
Which nail gun is right for your project?
Choose by the job and required fastener, then compare tools within that type. A framing nailer, finish nailer and brad nailer serve different purposes even when their nail lengths overlap.
| Nail gun type | Common jobs | Main buying check | Poor fit |
|---|---|---|---|
| Framing nailer | Framing, subflooring, roof decking and sheathing | Required nail size, head style and collation | Small decorative molding |
| Finish nailer | Heavier molding, chair rail and compatible cabinetry work | Gauge, length and enough backing for the joint | Very thin trim that splits easily |
| Brad nailer | Light decorative molding, casing details and shoe molding | Brad length and whether the joint needs more holding strength | Structural construction |
| Pin nailer | Delicate trim and holding small parts during glue-up | Pin compatibility and the joint's lasting strength | Joints that depend on substantial nail holding power |
For a mixed trim project, you may need more than one fastening method. Thick baseboard and its thin shoe molding don't automatically call for the same nail.
A useful starting point is the trim maker's installation instructions. If you're deciding between the two common trim tools, our brad nailer vs finish nailer comparison explains the trade-offs.
When should you choose a framing nail gun?
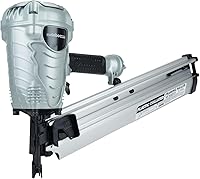
Choose a framing nailer for work that specifically calls for compatible framing nails. The Metabo HPT NR90AES1 accepts 21-degree plastic-collated nails from 2 to 3.5 in for jobs including framing, subflooring, roof decking and wall sheathing.
This air-powered tool suits a homeowner taking on a planned construction project with a suitable compressor available. Its 7.5 lb weight matters when judging how you'll support the tool during repeated fastening.
The NR90AES1 has tool-free depth adjustment and a switch between sequential and contact nailing. Depth control helps match the nail head position to the work, but the project's fastening requirements determine the correct result.
Buy it when its nail format matches your plans and you have room for an air setup. It makes more sense for repeated construction fastening than for a small repair requiring only a few nails.
Skip it for shoe molding, small decorative parts or other finish work. Its framing nails are not substitutes for brads or finish nails.
Before ordering fasteners, confirm the required nail diameter, head style, length and coating as well as the collation angle. Our framing nailer guide helps narrow the tool choice within this category.
When should you choose a finish nailer?
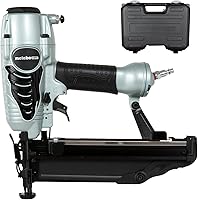
Choose a finish nailer when trim needs a thicker fastener than an 18-gauge brad. The Metabo HPT NT65M2S accepts 16-gauge finish nails from 1 to 2.5 in for molding, chair rail and compatible cabinetry work.
This pneumatic model suits trim work where you can keep a compressor nearby. At 3.7 lb, it gives buyers a clear tool-weight figure to consider for awkward positions and longer sessions.
Its tool-free depth adjustment helps control nail seating, while the no-mar tip helps protect the surface from nose marks. An adjustable exhaust lets you direct escaping air away from your face and work area.
The included case, air fitting and safety glasses cover some setup needs. You'll still need a compatible air supply and the right nails.
Choose this model for trim that calls for its fastener size. Skip it if your main work is very thin molding where a thicker nail could cause splits, or if avoiding a compressor is essential.
Cabinetry also includes joints that require screws or other joinery, so don't treat a finish nailer as a complete cabinet-building system. Read what a finish nailer is used for to separate fastening trim from building load-bearing joints.
When should you choose a brad nailer?
Choose an 18-gauge brad nailer for light trim where a small fastener and small filled hole are useful. It suits decorative molding and shoe molding when the material, backing and installation instructions allow brads.
The DeWalt DCN680B is the choice here for buyers who want battery-only operation without gas, a compressor or a hose. That setup suits repairs spread across several rooms and jobs where routing an air hose would interrupt the work.
Its tool-free jam release and stall release lever address different interruptions: a stuck nail and a stalled driver. Follow the manual's procedure for each rather than repeatedly pulling the trigger.
The tool also has depth adjustment, work lights and low nail lockout to help prevent dry firing and unwanted marks. Those features are useful when placing visible trim, but careful positioning still determines where the brad goes.
Choose it for hose-free trim work, especially if you already have a compatible DeWalt battery system. It's sold as tool only, so include a compatible battery and charger in your buying plan.
Skip it for structural work or joints that require the thicker hold of a finish nail. Buyers setting up a fixed workshop should also compare the complete cordless setup with the pneumatic option below.
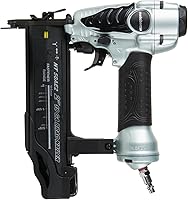
The DeWalt DWFP12231 Pneumatic Brad Nailer Kit suits buyers who already have a suitable compressor. It weighs 2.65 lb and includes a case and air fitting, making it worth considering for repeated trim work in one area.
It has a sequential-style trigger, tool-free depth adjustment and tool-free jam release. Its removable non-marring nose tip helps protect trim, and rear exhaust directs air away from the work.
Choose this model if an air hose fits your workspace and you want a brad nailer for light molding. Skip it if small jobs would require hauling a compressor between rooms or floors each time.
Its maintenance-free motor doesn't remove the need to inspect the tool, clean the magazine and care for the air system. Follow its manual rather than applying a general oiling routine.
For more task examples, see what a brad nailer is used for.
How do you choose the right nail size and gauge?
Choose gauge, length and nail format together. A nail can be the right length yet still be wrong for the tool or too thin for the joint.
Gauge describes nail thickness, with a higher gauge number generally meaning a thinner nail. A thinner brad leaves a smaller hole, while a thicker finish nail can provide more holding strength in a suitable joint.
Thickness also affects splitting risk. Narrow trim and fastening close to an end need particular care, regardless of whether the nailer can drive the chosen nail.
Match nail length to the full material stack
Account for the trim thickness, any layer behind it and the sound backing the nail must reach. Drywall or another covering uses part of the nail's length without necessarily providing the hold you need.
Avoid choosing the longest nail the tool accepts by default. Extra length can send the nail through the far side or farther into a wall cavity.
Check both sides of accessible work and identify hidden services before fastening into walls. If you cannot guarantee a safe path, stop and resolve that before using the nailer.
Check collation and outdoor suitability
Match the fastener's collation angle and format to the nailer. Similar-looking strips are not automatically interchangeable, and forcing the wrong strip into a magazine can damage the tool or cause feeding problems.
For outdoor work, the fastener coating and its compatibility with treated lumber matter as much as size. Follow the material maker's instructions and project requirements rather than assuming every framing nail is suitable outdoors.
Our guide to choosing a nailer gauge explains the common sizes. Use it to narrow the category, then confirm the exact fastener for your joint.
Should you choose a cordless or pneumatic nail gun?
Choose battery-only cordless for easy movement between work areas, or pneumatic when a suitable air setup fits your routine. Compare the complete system you'll carry, store and maintain.
Cordless doesn't change which fasteners a tool can drive. A battery brad nailer still serves brad-nailing tasks, so power source should come after tool type.
When battery power makes home projects easier
A battery-only nailer suits short jobs spread around a house. You can move between rooms without managing a hose or finding a place for a compressor.
Check battery and charger compatibility before buying a bare tool. An existing battery platform only helps if the exact battery works with the nailer.
Plan charging around the job rather than expecting any battery to last for a certain number of nails. Battery capacity, material and use affect how often you'll need to recharge.
When an air setup makes more sense
Pneumatic tools suit a workshop or longer project where the compressor can stay in one place. The nailer may be comfortable to handle, but hose drag and routing affect the whole setup.
Match the compressor's air delivery at the required working pressure to the tool's needs. Tank size alone doesn't tell you whether it can support your fastening pace.
Include a suitable hose, fittings and safe compressor placement in your plan. Keep hoses clear of walkways and prevent them from pulling against the tool as you reach.
Read cordless vs pneumatic nailers if both systems fit your project. The better choice is the one that supports your actual work pattern.
What should you check before buying a nail gun?
Check job fit and complete setup needs before comparing convenience features. A useful depth dial or work light won't fix a mismatch between the nailer and required fastener.
Make a short buying plan before choosing a model:
- Next project: Name the material and joint you'll fasten first.
- Fasteners: Confirm gauge, length, collation and any coating requirements.
- Power system: Identify the battery equipment or air supply you'll need.
- Trigger: Check the exact actuation system and operating sequence.
- Work position: Consider reach, grip and room around the tool.
- Surface protection: Look for a suitable nose tip and depth control.
- Interruptions: Check the jam-clearing and driver-reset procedures.
- Included items: Separate the tool from accessories you still need.
For overhead work, consider how you'll position yourself and support the workpiece. A tool that seems manageable at bench height can become awkward when your arms are raised.
Don't buy a larger nailer to cover possible future jobs if it doesn't suit the work in front of you. Borrowing or renting a task-specific tool may make more sense for an isolated project.
How do you set up a nail gun before the first nail?
Set up the tool according to its manual, then check depth on matching scrap before fastening the finished piece. Use the same material layers and backing where practical so the result is meaningful.
Read the loading sequence before connecting power. Different tools can require different steps, so don't copy a sequence from another nailer.
Inspect the tool and prepare the work
With the power source disconnected, check the magazine, nose, fasteners and visible tool condition. Don't use damaged nail strips or a tool with missing or damaged safety parts.
Secure the material so it cannot shift as you place the nose. Plan each fastening point and keep your supporting hand away from the possible nail path.
Look beyond the spot where the nail enters. A nail can bend or emerge through an edge, so the far side and nearby hands also need clearance.
Connect the correct power source
For pneumatic tools, use the specified working-pressure range and suitable connections. Don't exceed the tool's limit to force a nail into difficult material.
For battery tools, check compatibility and fit the battery only at the stage directed by the manual. Keep your finger off the trigger while connecting power or moving the tool.
Keep other people clear while checking operation. A scrap piece still needs stable support and a safe area behind it.
Adjust depth for the joint
Use the depth control to reach the nail-head position the job requires. For finish trim, that often means a head slightly below the surface for filling, without deeply crushing the wood.
If a nail sits proud, check the material, fastener, depth setting and power supply before changing anything. Disconnect power for adjustments as directed by the manual.
For sheathing and other construction work, follow the required head position closely. Overdriving can damage the material around the fastener and weaken the connection.
What firing mode should you use?
Choose full sequential actuation when available, especially for careful placement and home projects. Confirm the exact trigger system in the manual because tools labeled sequential may not all operate the same way.
Full sequential actuation requires placing the nose against the work before pulling the trigger, then releasing both before another nail can fire. This required order helps reduce unintended firing.
Contact actuation can fire whenever the nose contacts a surface while the trigger is held. Recoil or accidental contact can therefore create another firing opportunity.
A selectable trigger is a choice you must understand before work begins. Don't change modes simply to finish faster, and never bypass a trigger or contact safety.
OSHA's nail gun safety guidance explains trigger-related risks and safe work practices.
How do you use a nail gun safely?
Keep hands and bodies clear of every possible nail path, and follow the tool's operating instructions. Eye protection, a stable workpiece and deliberate trigger control belong in every session.
Wear any hearing protection or other gear required by the tool manual and conditions. Nearby people also need protection and a position outside the fastening area.
Keep your finger off the trigger while carrying, positioning or handing over the tool. Never point it at yourself or anyone else, even when you believe it's empty.
Don't hold two pieces together with your hand behind the fastening point. Use an appropriate clamp or support arrangement that keeps fingers away from possible nail exit points.
Avoid reaching beyond a stable stance to place one more fastener. Reposition the work, ladder or yourself before continuing.
Disconnect the battery or air supply before jam clearing, servicing, manual-directed adjustments or leaving the tool unattended. Follow the unloading procedure, since disconnecting power does not remove nails from the magazine.
If a nail injury occurs, stop work and seek urgent medical care rather than assuming a small entry wound means a minor injury. Our full guide to using a nail gun safely covers preparation and safe handling in more detail.
Which nail gun mistakes cause poor results?
The most common avoidable mistakes are using the wrong fastener, missing sound backing and driving too deeply. Correct the cause before adding more nails.
Using extra brads to replace a stronger fastener
More brads don't automatically turn a light trim joint into a suitable structural connection. If the joint requires a thicker nail, screw or other fastener, use that method.
The same rule applies to heavy trim that needs stronger attachment. Repeated fastening can leave more holes without fixing the underlying hold.
Fastening trim before checking its fit
Dry-fit pieces and resolve gaps before driving nails. Nails hold parts in position; they don't reliably straighten a poorly fitted joint.
Mark backing locations before covering them with trim. A neat row of fasteners is little help if most fail to reach sound material.
Driving close to edges without checking the result
Thin wood can split near its ends, and a nail can turn out through a nearby edge. Choose a fastening location and method that suit the trim shape.
Check the first fastening result before continuing along the whole piece. Stop if you see splitting, raised fibers, deep dents or nails emerging in the wrong place.
Repeatedly firing when nails don't seat
Stop when nails stop seating correctly. Check the power supply, fastener compatibility, feed path and depth setting instead of firing more nails into the same area.
A stalled driver, jam or damaged strip needs its own correction. For a brad tool that won't fire, follow our brad nailer troubleshooting guide alongside the model's manual.
How do you maintain and store a nail gun?
Keep the magazine and nose clean, inspect the tool before use, and follow its model-specific care instructions. Disconnect power before cleaning, inspection or jam clearing.
Care requirements vary between tools. Don't add oil because another pneumatic nailer needs it, and don't assume a maintenance-free motor means the entire tool needs no attention.
After each work session
Remove loose debris using the cleaning method allowed by the manual. Check for damaged fasteners, worn nose protection, loose parts and visible hose or cord damage where applicable.
For pneumatic equipment, follow the compressor's instructions for draining moisture and caring for the air system. Keep connections clean so debris doesn't enter during the next setup.
Store batteries as their maker directs, away from conditions that can damage them. Don't charge a visibly damaged battery.
When a nailer jams or behaves oddly
Disconnect the power source and follow the unloading and jam-clearing sequence. Keep the nose pointed in a safe direction while handling the tool.
Don't force a driver blade, defeat a safety part or keep using a tool that fires unexpectedly. Stop until the cause has been resolved through the manual's steps or qualified service.
Store the nailer securely with fasteners and power equipment handled as directed. Keep the manual accessible so the next session starts with the correct procedure.
Which nail gun should you choose for a home project?
Choose your nail gun by the next joint you need to fasten, then buy the power setup that fits your workspace. Use these decision rules to narrow the four options:
- Construction with compatible framing nails: Choose the Metabo HPT NR90AES1 when the plans match its fastener format and you have a suitable air supply.
- Light trim across several rooms: Choose the DeWalt DCN680B when battery-only operation makes movement and setup easier.
- Trim that calls for 16-gauge finish nails: Choose the Metabo HPT NT65M2S when you need that fastener and can work with a compressor.
- Light trim in an air-equipped workspace: Choose the DeWalt DWFP12231 when a pneumatic brad nailer fits your existing setup.
Before ordering, write down the exact nails and remaining equipment you'll need. That final check prevents a suitable tool from arriving without a usable power source or compatible fasteners.
Once the tool choice is settled, review GracefulGate's nail gun safety basics and plan your first fastening session around secure work, clear nail paths and correct depth.
Frequently asked questions
What nail gun should a homeowner buy first?
Buy a nail gun for your next planned project; an 18-gauge brad nailer suits light molding and shoe trim, while a finish nailer suits trim that needs a thicker fastener. For framing, follow the project's nail requirements rather than trying to make a trim nailer serve both jobs.
Can one nail gun do every job?
No, one nail gun cannot cover framing, finish work and delicate trim; each type accepts a specific range of fasteners, and nail length alone does not make tools interchangeable. Choose the required fastener first, then find a nailer that accepts its gauge, length and collation.
Is a cordless nail gun better than a pneumatic one?
A battery-only cordless nail gun suits scattered repairs and work where an air hose gets in the way; a pneumatic tool makes sense when you already have a suitable compressor and work mostly in one area. Compare the complete setup, including batteries, charging, hoses, fittings and storage.
Do you need a compressor for a nail gun?
A pneumatic nail gun needs a compatible compressor, hose and fittings; a battery-only model does not; check the exact power source before buying, since cordless tools can use different systems. Read about nail guns that work without a compressor if avoiding air equipment is a priority for your home projects.
What safety gear should you use with a nail gun?
Wear eye protection and any hearing protection or other gear required by the manual and work conditions; keep everyone clear of the nail path, including the far side of the work. Disconnect the power source before clearing jams or servicing the tool, and never bypass its safety features.