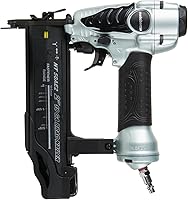
What Is a Brad Nailer Used For?
A brad nailer is a tool that drives thin 18-gauge nails into light trim and small wood parts. Understanding what a brad nailer is used for helps you choose it for small holes and light fastening, rather than heavy or structural joints.
On this page (9 sections)
- What is a brad nailer used for most often?
- What materials can an 18-gauge brad nailer fasten?
- Can you use a brad nailer for baseboards?
- When should you choose a finish or framing nailer?
- Is a pneumatic or cordless brad nailer better for you?
- Which of these brad nailers suits your projects?
- How do you set up and use a brad nailer safely?
- What mistakes and care habits matter most?
- What is a brad nailer worth buying for?
A brad nailer is a tool that drives thin 18-gauge nails into light trim and small wood parts. Its small nail heads leave holes that are easier to fill than those from larger finish nails.
Understanding what a brad nailer is used for starts with the joint: it suits decorative pieces and light fastening, not structural loads. Choose it for narrow molding, cabinet trim, and small assemblies where a larger nail could split the wood.
What is a brad nailer used for most often?
A brad nailer is most useful for light finishing work where a small hole matters. It attaches decorative wood parts and can hold glued pieces in place while the glue cures.
Common jobs include:
- Attaching narrow trim around a cabinet or bookcase.
- Securing shoe molding along a baseboard.
- Adding decorative strips to furniture.
- Holding small craft parts in alignment during assembly.
Brads don't pull a poor-fitting joint together like a screw can. Fit and clamp the pieces first, then use the nails to keep them from shifting.
For a glued assembly, the glue may provide much of the final strength. Don't rely on brads alone for a shelf, seat, or other part that must carry weight.
The complete guide to nail guns for home projects explains how different nailers fit common jobs.
What materials can an 18-gauge brad nailer fasten?
An 18-gauge brad nailer suits light wood trim, molding, and small wood assemblies when the fastener can reach sound backing. A thin nail leaves less visible damage, but it can still split narrow stock or bend along the grain.
Drywall isn't a substitute for solid backing. Plan the fastening points around framing or another suitable wood surface behind the trim.
What is a brad nailer's nail length based on?
Choose nail length from the trim thickness and the backing available, while staying within the tool's accepted range. The nail needs enough grip behind the trim without emerging from the far side.
For example, a trim strip over a thin cabinet panel needs a different length from casing over wall framing. Account for every layer, including any gap that adds length without adding grip.
Stay back from fragile ends and edges, and try the setup on scrap of the same material. A longer brad won't fix weak backing and can increase the chance of a hidden hazard.
Can you use a brad nailer for baseboards?
A brad nailer can attach some light, narrow baseboards and shoe molding. Thick, heavy, or bowed boards often call for a finish nailer with more holding power.
Shoe molding is the small strip along the bottom edge of a baseboard, so it isn't the same fastening job as the main board. A brad that suits that strip may be too small to hold the baseboard itself.
Fit the board against the wall before choosing a tool. If it takes force to hold the trim flat, don't expect thin brads to keep pulling it into place.
Our guide to using a brad nailer for baseboards explains where this tool fits. Locate hidden wiring and plumbing before choosing fastening points and nail lengths.
When should you choose a finish or framing nailer?
Choose a finish nailer for larger trim that needs more holding power, and a framing nailer for structural wood framing. Use a pin nailer for very delicate pieces where even a brad head is too visible.
Finish nailers commonly use thicker 15- or 16-gauge nails. See what a finish nailer is used for and our brad nailer vs finish nailer guide when comparing larger molding and casing jobs.
A framing nailer uses much larger fasteners for framing work. Learn what a framing nailer is used for before choosing one for a structural project, where fastener requirements come from the construction plan.
Pin nailers commonly use 23-gauge pins and depend more on glue or the joint design for strength. Our guide to what a pin nailer is used for explains that tradeoff.
Is a pneumatic or cordless brad nailer better for you?
Choose pneumatic power if an air setup fits your workspace, or cordless power if moving without a hose matters more. Include the compressor, hose, battery, and charger you need when comparing complete setups.
Pneumatic nailers can keep the weight in your hand low, but the hose needs room around furniture and finished surfaces. Cordless tools remove that hose, though the battery adds weight and needs charging.
For work at a bench or in one room, managing a hose may be easy. For small repairs spread through a house, cordless power can reduce setup steps.
See whether you can use a nail gun without an air compressor if you're starting without air equipment. Our cordless vs pneumatic nailer comparison covers the wider choice.
Which of these brad nailers suits your projects?
Choose the Metabo HPT for low tool weight, DeWalt for its sequential trigger and trim controls, or Ryobi for cordless movement. All 3 are brad nailers, so none replaces a larger tool when the joint needs stronger fasteners.
Metabo HPT NT50AE2: for extended trim sessions
The Metabo HPT weighs 2.2 lb and accepts brads from 5/8 in to 2 in. It suits buyers who already have air equipment and want a light tool for repeated positioning around trim or furniture parts.
Its no-mar tip helps protect the surface, while the reload indicator helps you spot a low magazine. Selectable sequential and bump modes give a choice of operation; use sequential mode for deliberate nail placement.
Skip it if you want to avoid a compressor and hose. Don't choose bump mode simply for speed when placing nails near delicate edges.
DeWalt DWFP12231: for deliberate trim placement
The DeWalt uses a sequential-style trigger and accepts the same nail-length range as the Metabo HPT. It suits buyers who want controlled placement for casing, decorative molding, and other light trim.
Tool-free jam release makes nail removal more convenient after disconnecting the air supply. The removable non-marring tip has on-tool storage, and the rear exhaust directs discharge away from the work.
DeWalt specifies a maintenance-free motor, but the nose and magazine still need care. Skip this model if cordless movement is your priority or you specifically need selectable bump operation.
Ryobi P321: for repairs across several rooms
The Ryobi P321 is an 18V ONE+ cordless model, with the battery and charger sold separately. It suits buyers who want to move between small trim jobs without routing an air hose.
It weighs 6 lb, so consider how long you'll hold the tool at shoulder height or in an awkward position. An existing compatible battery setup makes this tool-only option easier to fit into your workshop.
Skip it if low tool weight is your main need. Confirm its accepted nail lengths in the manual before buying fasteners for a specific project.
How do you set up and use a brad nailer safely?
Start with the correct brads, secured work, and a depth check on scrap. Wear eye protection, follow the manual's hearing-protection guidance, and keep everyone clear of the fastening area.
- Disconnect the air supply or remove the battery before loading or servicing, as the manual directs.
- Load the correct gauge and length, then close the magazine fully.
- For pneumatic tools, set regulated air pressure within the manual's operating range.
- Clamp the work and make a trial drive in matching scrap.
- Adjust depth until the head sits just below the surface without crushing the wood.
Keep the nose flat against the work and your finger off the trigger until you're ready. Keep hands away from the back and sides of the nail path because a brad can deflect or exit unexpectedly.
Read our guide to using a brad nailer for operating steps, and review how to use a nail gun safely before starting.
What mistakes and care habits matter most?
The most common mistakes are using excessive depth, choosing unsuitable nails, and expecting brads to close gaps. Correct the setup or joint rather than adding more nails.
Overdriving leaves a crater that takes more filler and may weaken the trim around the head. If a nail sits proud, check the depth setting, fastener compatibility, and power supply before increasing pressure.
Keep the no-mar tip clean so trapped grit doesn't mark the surface. With power disconnected, remove debris from the magazine and nose according to the manual.
Follow the model's lubrication instructions; don't assume every pneumatic nailer needs oil. Store the tool dry, and inspect the hose or battery connection before use.
If the tool stops firing, disconnect power before inspecting it. Our guide to why a brad nailer isn't firing covers checks without repeated trigger pulls.
What is a brad nailer worth buying for?
A brad nailer is worth buying for repeated light trim, molding, and small wood assembly jobs. Decide from the fastening task first, then choose the power source and tool features.
Pick Metabo HPT if low weight matters during long trim sessions. Pick DeWalt if its sequential trigger and tool-free jam release fit your work, or Ryobi if cordless movement matters more than tool weight.
For heavier trim, compare the finish nailer guide; for structural work, use the framing nailer guide. If you're still deciding what a brad nailer can handle, the brad nailer vs finish nailer guide is the next step before buying.
Frequently asked questions
What is a brad nailer used for?
A brad nailer fastens light trim and small wood parts with thin 18-gauge brads; common jobs include narrow molding, cabinet trim, shoe molding, and craft pieces. The small heads leave holes that need little filling, but brads aren't suitable for structural joints or heavy parts under load.
Can a brad nailer hold baseboards?
A brad nailer can attach some light or narrow baseboards when the nails reach sound backing; thick, heavy, or bowed boards may need a finish nailer and a different fastening plan. Check the trim thickness, locate suitable backing, and avoid hidden wiring and plumbing before choosing nail length.
Is a brad nailer the same as a finish nailer?
No, a brad nailer uses thin 18-gauge nails, while finish nailers commonly use thicker 15- or 16-gauge nails; brads suit small trim where hole size matters. Finish nails provide more holding power for larger trim, but leave bigger holes and can split delicate pieces more easily.
Do brad nailers need an air compressor?
Pneumatic brad nailers need an air compressor and hose, while battery-powered models don't; include the whole power setup in your buying decision, rather than just the nailer. The Ryobi P321 here is a tool-only cordless option, so its compatible battery and charger must be bought separately unless you already have them.