Cordless vs Pneumatic Nailers: Which Is Better? (October 2026)
For a cordless nail gun vs pneumatic choice, pick cordless for scattered repairs and room-to-room work or pneumatic for a fixed workspace with an air supply. Match the fastener to the project before choosing the power source.
On this page (9 sections)
- Cordless nail gun vs pneumatic: which setup fits your work?
- Which of these 3 brad nailers should you buy?
- How do weight, hose drag and noise affect the choice?
- Which type suits repeated fastening?
- How should you prepare each type before starting?
- Which one suits trim, finish work and baseboards?
- What care does each setup need?
- Which mistakes cause poor results or unsafe use?
- Cordless nail gun vs pneumatic: make the final choice
For a cordless nail gun vs pneumatic choice, pick cordless for scattered repairs and pneumatic for work near an existing air supply. The better tool fits your work area, your available equipment and the fastener your project needs.
Cordless removes the compressor and hose from the job, but you must keep a compatible battery charged. Pneumatic puts the air source elsewhere, leaving you with a hose to route and a compressor to prepare.
The 3 tools below are 18-gauge brad nailers for trim tasks. This comparison helps you choose their power source; it doesn't make them substitutes for framing or heavier finish nailers.

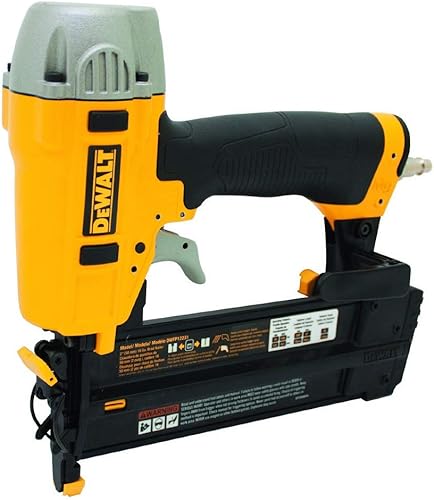 Best for compressor-equipped workshops
DeWalt DWFP12231 Pneumatic Brad Nailer Kit
Cordless nail gun vs pneumatic: which setup fits your work?
Choose cordless for frequent starts and moves; choose pneumatic for a work area you can leave connected. Think through a normal project from carrying equipment in to putting it away.
A few loose molding pieces in separate rooms favor cordless. You can move between them without finding a new hose route or shifting a compressor around furniture.
A workshop session with all your pieces beside one bench favors pneumatic. Once the air equipment is ready, the hose may cause little disruption because the work stays within reach.
For occasional home projects, storage matters too. A compressor and coiled hose need their own space, while a cordless setup needs room for the tool, battery and charger.
Don't buy air equipment solely because a pneumatic nailer looks simple on its own. Count the setup, transport and storage work that comes with the whole system.
Our guide to using a nail gun without a compressor explains the alternatives. If you're choosing your first tool, start with our complete nail gun guide to match the nailer class to your projects.
Which of these 3 brad nailers should you buy?
Choose the cordless DeWalt for moving trim work, the pneumatic DeWalt for an existing air setup, or the WEN for an included battery and charger. Each solves a different equipment problem.
Cordless vs pneumatic nail guns for moving trim work
The DeWalt DCN680B suits room-to-room molding and casing jobs, especially if you already own a compatible DeWalt battery and charger. It's tool only, so buyers starting from scratch need both before they can work.
Its supported brads run from 5/8 to 2-1/8 in. Tool-free depth adjustment helps you set the head position, while separate jam and stall release features address different interruptions.
The low-nail lockout prevents dry firing and unwanted marks, and the LED lights provide workspace light and diagnostics. Those features suit visible trim where an empty magazine or a poorly seated nail can interrupt careful placement.
Skip this model if you want a package that includes its power source. Also choose a different nailer class if the project calls for heavier fasteners.
Pneumatic DeWalt for a prepared workshop
The DeWalt DWFP12231 suits buyers who already have compatible air equipment and can keep the hose clear of their work. It accepts brads from 5/8 to 2 in and includes a carrying case and 1/4 in fitting.
Its sequential trigger suits deliberate placement, while the removable non-marring nose tip helps protect the contact area. The rear exhaust directs exhaust away from the work.
Skip it if carrying a compressor would turn each small repair into a larger setup job. The included fitting doesn't replace the need for a suitable compressor and hose.
WEN kit for starting without air equipment
The WEN 20512 suits first-time cordless buyers who want a battery and charger included. The kit has a 2.0Ah battery, 400 brads and a magazine that holds 100 nails.
It accepts brads from 3/4 to 2 in, so skip it if your planned work needs 5/8 in fasteners. Its LED indicator tracks battery status, magazine fill and tool temperature, helping you identify what needs attention.
For more choices within each power source, compare our best cordless brad nailers and best pneumatic brad nailers.
How do weight, hose drag and noise affect the choice?
Consider what you hold, what follows you and where the noise occurs. A light tool can still be awkward if its hose catches on corners.
The pneumatic DeWalt has a stated weight of 2.65 lb, compared with 1.8 kg, about 3.97 lb, for the cordless DeWalt. Confirm whether each figure includes accessories or a battery before treating that as a working-weight comparison.
For overhead molding, weight in your hand matters because you must hold the nose steady while reaching. For work around cabinets, hose pull can make it harder to approach a joint from the angle you need.
Route an air hose around furniture rather than across finished edges or busy walkways. Leave enough slack to position the nailer without stretching the hose tight.
Cordless removes compressor cycling from the room, but firing still makes noise. Plan hearing protection for the task and keep other people clear of the work area.
Which type suits repeated fastening?
Pneumatic fits sustained work near adequate air equipment; cordless fits a job spread across several locations. Neither power source alone tells you how well a nailer will seat a particular brad in a particular material.
For pneumatic work, check the nailer's air requirements against the compressor's output and operating instructions. Tank size alone doesn't tell you whether the air supply can support your work pace.
For cordless work, plan charging around the job. A charged spare can reduce interruptions if it is compatible, but don't assume a battery from another brand or voltage family will fit.
Avoid choosing by a maximum firing-speed claim when your project involves careful alignment. Holding trim in place, checking joints and setting nail depth may take more time than driving the brads.
If nails begin sitting proud, stop and find the cause. A low battery, unsuitable air setup, wrong fastener or material mismatch calls for a different fix, so repeatedly firing nearby is a poor substitute for diagnosis.
How should you prepare each type before starting?
Prepare the material and fasteners first, then connect the power source in the order your manual specifies. A correct setup prevents many depth and feeding problems before they reach visible trim.
For either tool, confirm the brad gauge, supported length and loading direction. Check the work area for hidden wiring or plumbing, and support loose pieces so they can't shift under the contact tip.
Dry-fit the trim and mark the intended fastening points before picking up the nailer. Keep the joint aligned with clamps or other suitable support rather than putting fingers near the nail path.
For cordless, inspect the battery and tool for damage and check the charge. Load and attach the battery only as directed, keeping your finger away from the trigger.
For pneumatic, inspect the hose and connections, then set the regulator within the nailer's specified range. Never exceed that range to force a nail through unsuitable material.
Drive a brad into scrap that matches the trim and backing. Adjust for a head seated just below the surface without a deep dent, and check again when the material changes.
Our guide to how to use a brad nailer covers the basic workflow from loading to placement.
Which one suits trim, finish work and baseboards?
Choose the fastener before the power source. Brad nailers suit many small trim tasks, but air or battery power doesn't change the holding role of an 18-gauge brad.
Thin decorative molding benefits from a small fastener hole, while wider or heavier trim may call for finish nails. Joint design, backing material and the trim manufacturer's fastening instructions all affect that choice.
Both DeWalt models here are intended for decorative molding and casing. Our guide on what a brad nailer is used for explains where this tool fits.
Choose a length that passes through the trim and reaches suitable backing without creating an unsafe nail path. A longer brad isn't automatically better, especially near hidden services or the edge of a narrow piece.
Read what gauge nailer you need if you're unsure whether brads can hold the work securely.
Can either type work for baseboards?
Either power source can suit baseboard work when the fastener is right. Small shoe molding and a tall, heavy baseboard can have different fastening needs even though they sit beside each other.
Our guide to using a brad nailer for baseboards explains the limits. Compare finish nailers if the trim requires a larger fastener.
What care does each setup need?
Keep the tool clean and follow its own maintenance instructions. A cordless tool still needs care, and a maintenance-free pneumatic motor doesn't make the compressor maintenance-free.
Disconnect the power source before cleaning, clearing a jam or inspecting the feed path. Remove loose debris without putting your fingers near the driver or bypassing any safety feature.
For the pneumatic DeWalt, follow the maintenance-free motor instructions rather than adding oil by habit. Care for the compressor separately, including draining its tank as directed and checking the hose for wear.
For cordless, keep the battery contacts clean and dry, and store batteries within the manufacturer's temperature limits. Don't charge a damaged battery or use a charger that isn't approved for it.
WEN recommends wiping its tool with a damp towel and mild soap and warns against soaking it in cleaning solutions. Avoid letting liquid enter the housing.
If a nailer stops firing, disconnect it before checking the magazine or a possible jam. Our brad nailer troubleshooting guide helps you work through likely causes instead of repeatedly pressing the trigger.
Which mistakes cause poor results or unsafe use?
Wrong fasteners, poor depth settings and unsafe hand placement cause problems with either power source. Fix the setup before trying to work faster.
Don't confuse a jam with a stall. Follow the manual's procedure for the actual problem, and never point the tool toward yourself while checking whether it has reset.
Don't bury brads by pushing harder or raising air pressure beyond the allowed range. Check the depth control, power supply, fastener compatibility and material instead.
Keep your free hand away from the firing point and the possible path of a nail that bends or exits the work. A nail can emerge from an edge even when the nose appears correctly placed.
Wear eye protection, keep your finger off the trigger while moving and never carry the nailer by its hose. Disconnect it before leaving it unattended or handing it to someone else.
Use sequential actuation for deliberate placement when available and follow the exact trigger sequence in the manual. The cordless DeWalt offers sequential or contact actuation; understand the difference before changing modes.
Read how to use a nail gun safely before starting. Never bypass the contact tip or continue using a tool with a damaged safety feature.
Cordless nail gun vs pneumatic: make the final choice
Pick the tool that removes the main obstacle in your usual project. That might be carrying air equipment between rooms, holding extra weight overhead or assembling a battery setup from scratch.
Choose the DeWalt DCN680B if moving freely is the priority and you can provide its compatible battery and charger. Choose the DeWalt DWFP12231 if your air equipment is ready and most fastening happens nearby.
Choose the WEN 20512 if you want the battery and charger included and its fastener range covers your plans. Skip all 3 if the project calls for framing nails or heavier finish fasteners.
Before ordering, name your next 2 projects and check their required fasteners. Then use how to choose a cordless nail gun to confirm whether a battery-powered setup fits the work you expect to do.
Product fit notes
Frequently asked questions
Is a cordless nail gun as powerful as a pneumatic one?
Power depends on the exact tool, fastener and material, so neither power source wins every job; these models accept overlapping brad lengths, but that doesn't prove equal driving ability in every wood. Choose the right nailer class first, then check fastener compatibility and set the depth on matching scrap.
Do cordless nailers need a compressor?
The 2 cordless nailers here need no compressor or air hose because they use battery power. The DeWalt DCN680B needs a compatible battery and charger bought separately unless you already own them; the WEN 20512 includes both, which makes it simpler to assemble a cordless setup from scratch.
Are pneumatic nailers lighter than cordless nailers?
Pneumatic tools can put less weight in your hand because the air source sits elsewhere, but compare exact models and working configurations; battery size changes cordless working weight, while hose pull affects pneumatic handling. For overhead trim, consider both the load you hold and how freely you can position the nose.
Which nailer is better for trim work?
Cordless suits trim repairs spread across rooms, while pneumatic suits repeated fastening near an air supply. The trim itself still determines the fastener: delicate molding may suit brads, while heavier pieces can need finish nails; choose the gauge and length before deciding which power source makes the work easier.
Can a pneumatic nailer work without a compressor?
A pneumatic nailer needs a suitable compressed-air source; a battery alone cannot power it. For home projects without air equipment, a battery-powered model avoids that setup; our guide to using a nail gun without a compressor explains the options and what you need before you start.


