What Gauge Nailer Do I Need?
For most trim projects, the answer to 'what gauge nail gun do I need?' is 18 gauge for delicate trim, 16 gauge for general finish work, or 15 gauge for heavier molding. Choose the gauge your joint needs, then check nail length and tool compatibility.
On this page (10 sections)
- What gauge nail gun do I need for common jobs?
- How does nail gauge affect grip and the finished surface?
- Who should choose the 18-gauge Metabo HPT NT50AE2?
- Who should choose the 16-gauge Metabo HPT NT65M2S?
- Who should choose the 15-gauge Metabo HPT NT65MA4?
- Do you need a pin nailer or framing nailer instead?
- How do you choose nail length and set drive depth?
- What setup, care, and use habits matter most?
- Which mistakes should you avoid when choosing a gauge?
- What gauge nail gun should you buy first?
You need an 18-gauge nail gun for delicate trim, a 16-gauge nailer for general finish work, or a 15-gauge nailer for heavier molding. If you're asking “what gauge nail gun do I need?”, start with the piece you're attaching and the backing that will hold it.
Gauge numbers run backward: a lower number means a thicker nail. Choose enough grip for the joint without leaving an oversized hole or splitting narrow stock.
What gauge nail gun do I need for common jobs?
Use 18 gauge for light trim, 16 gauge for everyday finish carpentry, and 15 gauge for heavier finish pieces. Structural framing needs a different tool and fastener.
| Job | Starting choice | Main check |
|---|---|---|
| Shoe molding, small trim, decorative strips | 18-gauge brad nailer | Is the piece light enough for brads? |
| Chair rail, medium molding, cabinet trim | 16-gauge finish nailer | Will the nail reach sound backing? |
| Larger casings, crown, heavier base molding | 15-gauge finish nailer | Can the stock accept the thicker nail? |
| Tiny trim held while glue sets | 23-gauge pin nailer | Does the glue joint supply the lasting hold? |
| Structural framing | Framing nailer | Do the fasteners meet the connection requirements? |
These are starting points, since trim thickness, material, and attachment method can change the choice. Cabinet trim is finish work, but assembling or hanging a cabinet may require screws or other specified fasteners.
Our complete guide to nail guns for home projects explains the tool families. For the finish-work options, see what a brad nailer is used for and what a finish nailer is used for.
How does nail gauge affect grip and the finished surface?
Thicker nails generally offer more holding power and leave larger holes, with other factors equal. Smaller brads suit narrow trim because they remove less material and leave less filling work.
Gauge can't make up for poor backing. A thick nail driven into an empty wall cavity won't hold trim the way a suitable nail driven into framing or other sound backing can.
Material also matters: thin wood near an end can split, while a nail can deflect through the side of a piece. Position and support the work before firing, and keep your hands clear of possible exit paths.
What gauge nail gun do I need for baseboards?
Choose 16 or 15 gauge for substantial baseboard, depending on its fastening requirements. An 18-gauge brad nailer is often better suited to the smaller shoe molding fitted along its bottom edge.
Treat those as separate tasks rather than expecting one nail size to suit both. Our guide to using a brad nailer for baseboards explains where brads fit and where they fall short.
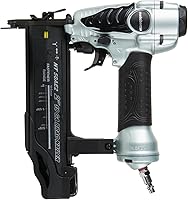
Who should choose the 18-gauge Metabo HPT NT50AE2?
Choose the NT50AE2 for small trim, decorative strips, and furniture trim where a small hole matters. Skip it as your only nailer if your main project calls for heavier finish nails.
It accepts 18-gauge brads from 5/8 in to 2 in and weighs 2.2 lb. Its tool-free depth dial helps set the head below the surface without driving it too deep, while the no-mar tip helps limit nose marks.
This pneumatic tool suits a workspace where you already have, or plan to use, a compressor and hose. Account for that setup before choosing it for occasional repairs around the house.
Its reload indicator helps you spot a low magazine, and the easy-to-clear nose provides access to a jammed nail. Disconnect the air supply before opening the nose or handling fasteners.
Follow our guide to using a brad nailer for setup. If holding power is your main concern, compare brad nailers and finish nailers before buying.
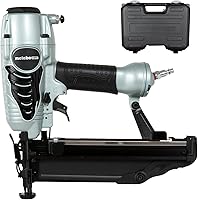
Who should choose the 16-gauge Metabo HPT NT65M2S?
Choose the NT65M2S for molding, chair rail, and cabinet trim that needs more grip than brads provide. It's a sensible first finish nailer if most of your planned work falls in that middle range.
It takes 16-gauge finish nails from 1 in to 2-1/2 in and weighs 3.7 lb. Tool-free depth adjustment lets you tune the head position for the material rather than relying only on air pressure.
Skip it for tiny decorative pieces where a larger fastener could split the stock or create too much filling work. Also choose a different fastening method when a joint calls for screws, structural nails, or hardware.
The adjustable exhaust lets you direct discharged air away from your face or workpiece. Its air duster can clear loose debris, but keep the air stream away from people and wear eye protection.
Who should choose the 15-gauge Metabo HPT NT65MA4?
Choose the NT65MA4 for larger finish pieces and corners where magazine access matters. Its angled magazine helps position the tool around crown molding, casings, and similar trim.
It accepts 15-gauge angled DA nails from 1-1/4 in to 2-1/2 in and weighs 4.2 lb. Buy the correct DA fasteners, since gauge and length alone don't guarantee compatibility.
Skip this model for delicate strips or projects where small holes are the priority. Its thicker fastener fits heavier finish work, but it doesn't replace framing fasteners or required staircase hardware.
The tool-free depth adjuster helps control countersinking, and the integrated air duster clears loose debris. Use the angled magazine to gain access while keeping the nose aligned with the intended nail path.
Do you need a pin nailer or framing nailer instead?
Choose a pin nailer for suitable tiny decorative pieces and a framing nailer for structural framing. Neither fills the same role as a general finish nailer.
Pins can hold delicate parts in place while glue sets, but their small size limits their grip. See brad nailer vs. pin nailer if your project involves small trim or visible wood surfaces.
For construction work, learn what a framing nailer is used for before choosing a tool. Match structural fasteners to the plans and connection requirements, including any required hardware.
How do you choose nail length and set drive depth?
Choose a length that passes through the attached piece and reaches enough sound backing for the joint. Don't choose the longest nail your tool accepts by default.
- Measure the trim and account for layers between it and the backing.
- Follow the project's required penetration and fastener spacing.
- Check the nailer's approved gauge, length, and fastener format.
- Identify hidden wiring and pipes before fastening.
- Set drive depth on an offcut with the same material stack.
Start within the manual's recommended air-pressure range, then use the depth control to refine the result. Excess pressure isn't a cure for poor nail selection or a worn tool.
Aim for the head position your finish requires without crushing the surface. If nails remain proud, check pressure, compatibility, and the manual before increasing the setting.
What setup, care, and use habits matter most?
Read the manual, secure the work, and use eye protection before connecting the air supply. Use sequential actuation for deliberate placement, and follow the manual's loading and connection order.
Keep your finger off the trigger while moving or positioning the nailer. Hands, bystanders, and body parts must stay clear of the fastener's possible path, including beyond the workpiece.
Disconnect the air supply before clearing jams, cleaning, or servicing the tool. Follow the manual's lubrication schedule, inspect the hose and fittings, and keep the magazine free of debris.
Drain compressor moisture as its manual directs and store the nailer dry. Our guide to using a nail gun safely covers handling and setup in more detail.
Which mistakes should you avoid when choosing a gauge?
Avoid choosing by hole size alone or assuming a thicker nail fixes every weak joint. The backing, nail length, and connection design matter as much as gauge.
- Buying a larger gauge number for more strength: higher numbers mean thinner nails.
- Using nails to pull warped trim tight: fit and secure the piece before fastening.
- Overdriving heads: deep holes add filling work and can reduce the head's hold.
- Firing close to an edge or end: allow suitable spacing to reduce splitting.
- Using finish nails for structural joints: follow the required fastening method instead.
Stop when nails bend, jam repeatedly, or exit through the side. Check the material, settings, fasteners, and tool condition before continuing.
What gauge nail gun should you buy first?
For “what gauge nail gun do I need?”, buy for your next real project: the NT50AE2 for small trim, the NT65M2S for general finish work, or the NT65MA4 for heavier molding and corner access.
Write down the material thickness, backing, and required nail length before ordering. That short list helps you choose both the tool and compatible fasteners without buying extra capacity you won't use.
If you're still deciding between small-hole finish work and stronger trim fastening, continue to brad nailer vs. finish nailer. For a wider project plan, use our nail guns for home projects guide.
Frequently asked questions
What gauge nail gun is best for trim?
Choose 18 gauge for narrow, delicate trim and 16 gauge for general molding that needs more grip. A 15-gauge finish nailer suits heavier trim when the fastening requirements allow it.
Check the trim thickness, backing, and nail length before deciding, since gauge alone doesn't determine whether the joint will hold.
Is 15 gauge or 16 gauge better?
Choose 15 gauge for heavier molding or 16 gauge for general finish work where a smaller hole matters. Neither is the better choice for every joint.
Both need sound backing and suitable nail length, while the nailer's magazine shape affects access and the fastener type you must buy.
What gauge nailer leaves the smallest holes?
A 23-gauge pin nailer generally leaves smaller holes than an 18-gauge brad nailer, but its pins offer less holding power. Among the 3 tools here, choose the 18-gauge model for the smallest holes.
Use pins for suitable delicate work, often with glue, rather than as a replacement for required finish nails.
Can one nail gun use different gauge nails?
Most nailers accept only one gauge and a specific fastener type, so don't load another gauge unless the manual allows it. Length, magazine angle, and collation must also match.
For example, a tool that accepts 15-gauge DA nails needs that fastener format, even if another nail has the same length.