How to Choose a Cordless Nail Gun
Choose a cordless nail gun by matching the fastener type and length to your project first. Then compare battery compatibility, weight, depth control, safety features and whether you need a tool-only model or a kit.
On this page (8 sections)
- Which cordless nail gun type fits your project?
- Which of these cordless nailers suits your work?
- How should you compare battery, weight and kit contents?
- Which controls and safety features matter?
- How do you set up a cordless nail gun for trim?
- What mistakes cause poor results or wasted money?
- How should you care for a cordless nailer between jobs?
- Which cordless nail gun should you choose?
Choose a cordless nail gun by matching the fastener type and length to your project first. Battery compatibility comes next, followed by working weight, depth control and the controls you'll use to place each nail safely.
For light decorative trim, start with an 18-gauge brad nailer. For heavier trim that needs a thicker fastener, compare finish nailers; structural woodwork calls for a framing nailer and the correct structural fasteners.
If you're new to these tools, our complete guide to nail guns for home projects explains the main types. Read how to use a nail gun safely before loading or operating one.
Which cordless nail gun type fits your project?
Choose by the joint and fastener, rather than the cordless label. A battery changes how you power the tool, but it doesn't make a brad nailer capable of doing a framing nailer's job.
Brad nailers commonly use 18-gauge nails for light trim and small wood projects. Their narrow fasteners leave smaller holes than thicker finish nails, but offer less holding strength.
Finish nailers use 15- or 16-gauge nails for work such as larger casing, baseboards and crown molding. Framing nailers drive larger fasteners for wood framing and other heavy assemblies.
| Nailer type | Typical use | Main buying check |
|---|---|---|
| Brad nailer | Small molding, shoe molding and delicate trim | Whether a thin nail gives the joint enough hold |
| Finish nailer | Larger casing, baseboards and crown molding | Correct gauge, nail length and magazine angle |
| Framing nailer | Structural wood framing and heavy assemblies | Required fastener type, collation and project requirements |
Lower gauge numbers mean thicker nails within these trim-nailer categories. Nail length is a separate choice, so an 18-gauge tool doesn't accept every length of 18-gauge brad.
Match length to the trim thickness and the backing you need to reach. Drywall adds distance but isn't the solid wood backing a trim nail needs for a secure hold.
Avoid choosing the longest nail the tool accepts by default. Excess length can send a nail through the back of the assembly or into a hidden hazard.
For a closer comparison, read brad nailer vs finish nailer. Our guide to what gauge nail gun you need helps connect fastener size with the work.
Which of these cordless nailers suits your work?
Choose among these models by trim size and battery needs. The first 3 are brad nailers; the fourth serves projects that call for a thicker finish nail.
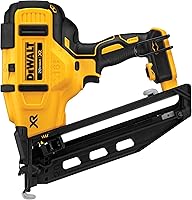
DeWalt DCN680B: a cordless nail gun for detail trim
The DeWalt DCN680B suits decorative molding, casing, kitchen crown and shoe molding when an 18-gauge brad is the right fastener. It accepts brads from 5/8 to 2 1/8 in and runs on the DeWalt 20V MAX battery platform.
Choose it if accurate placement and accessible controls matter for your trim work. Its micro nose improves the view of the nail position compared with the older DeWalt DC608, while LEDs illuminate the work area and provide tool diagnostics.
Tool-free jam release and a separate stall-release lever give you ways to address those different stoppages. Low nail lockout helps prevent dry firing and unwanted marks when the magazine runs low.
Skip this tool if the joint requires thicker finish nails or structural fasteners. It's also a tool-only model, so buyers starting without compatible batteries need to account for the battery and charger.
Ryobi P321: an option for existing ONE+ users
The Ryobi P321 makes the most sense for buyers who already have compatible Ryobi 18V ONE+ batteries and need an 18-gauge brad nailer. Its battery and charger are sold separately.
The tool weighs 6 lb, so consider the position of your work as well as battery compatibility. Holding a nailer against shoe molding is a different task from keeping it raised for a long run of trim.
Before choosing it, confirm that the P321 accepts the exact brad lengths your project needs and that its controls suit your workflow. Those checks matter more than keeping every tool in the same battery family.
Skip it if you need a ready-to-start package with a battery and charger included. A finish or framing job also calls for a different tool, even if you already own ONE+ batteries.
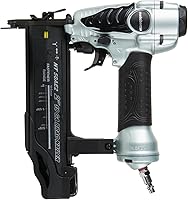
Metabo HPT NT1850DFT: a kit for starting from scratch
The Metabo HPT NT1850DFT suits buyers starting without a cordless battery setup. Its kit includes a 2.0Ah lithium-ion battery with a fuel gauge and a rapid charger.
It drives 18-gauge brads from 5/8 to 2 in and has tool-less depth adjustment. Metabo HPT says its air spring system delivers up to 2 nails per second without ramp-up time and up to 1,300 nails per charge.
Treat the charge figure as a planning estimate, since nail length, material and working conditions affect battery use. For small repair jobs, the included charging setup is a stronger reason to choose it than the maximum firing rate.
Metabo HPT describes this model as smaller and lighter than its previous model, which makes it worth considering for cramped work areas. Check clearance with the battery fitted, since the nose still needs room to sit squarely against the trim.
Skip it when your joint requires a thicker nail or a brad longer than its accepted range. Buyers committed to another battery family should also weigh the convenience of a kit against maintaining another charger.
DeWalt 15-gauge finish nailer: for more substantial trim
The DeWalt 20V 15 Ga Angled Cordless Finish Nailer suits trim that calls for thicker finish nails. It drives 15-gauge angled nails from 1 1/4 to 2 1/2 in for applications including crown molding, casing and baseboards.
Its inline magazine helps with access in tight spaces and different orientations. Tool-free depth adjustment, jam release and a stall-release lever support setup and recovery from stoppages.
Choose it for the fastener your larger trim needs, rather than as an upgrade from a brad nailer for every task. Thicker nails leave larger holes and can be a poor match for narrow, delicate pieces.
The tool weighs 6.6 lb and comes as a tool-only model. Skip it for fine trim that suits brads, and compare our best cordless finish nailers if you need other finish-nailer options.
How should you compare battery, weight and kit contents?
Compare the complete working setup, including a compatible battery, charger and the nails your project needs. A bare tool only makes sense when you have, or plan to buy, everything required to use it.
Battery voltage alone doesn't prove compatibility or tell you which nailer drives better. DeWalt's 20V MAX designation refers to maximum initial voltage; nominal voltage is 18V.
Confirm the exact battery family in the tool manual. Batteries from different brands aren't interchangeable just because their voltage numbers look similar.
A larger battery can extend work between charges, but it also changes weight and balance. For short trim jobs, a compatible battery that keeps the tool manageable may be more useful than the largest pack available.
Compare weights on the same basis, with batteries included or excluded consistently. Then consider how far you must reach, how often you'll lift the tool and whether its magazine clears nearby walls or cabinets.
For a first cordless nailer, check these package details:
- Battery and charger: Included together, sold separately or already in your tool collection.
- Fasteners: Correct gauge, length, angle and collation for the exact model.
- Storage: A safe place for the tool, batteries and loose nail strips.
- Work support: Clamps or other supports that keep the piece stable and your hands clear.
If you already run air tools in a fixed workspace, compare the whole setup in cordless vs pneumatic nailers. Cordless convenience is most useful when removing the hose solves a real problem in your work.
Which controls and safety features matter?
Prioritize full sequential actuation, clear depth control and a safe jam-clearing process. These affect how you place nails and recover from a problem more directly than a maximum firing-speed claim.
Full sequential actuation requires the controls to operate in a set sequence for each nail. OSHA's nail gun safety guidance explains how this trigger design reduces unintended firing risk.
The DeWalt brad and finish models offer sequential or contact actuation, and the Metabo HPT has sequential or bump fire modes. Read each manual to identify the exact sequence and select full sequential operation when available.
Depth adjustment controls how far the nail sits below the surface. It cannot correct the wrong fastener, weak backing or poor placement at the edge of a board.
A jam and a stalled driver aren't necessarily the same fault. Follow the model's instructions for the symptom instead of opening parts or moving levers at random.
Tool-free access doesn't mean you should clear a jam with the battery installed. Disconnect power, follow the unloading procedure and keep the nose directed safely while working on the tool.
Wear safety glasses and the other protection required by the manual and work conditions. Never bypass a contact safety, and keep your finger off the trigger while carrying or repositioning the nailer.
For the complete handling sequence, read how to use a nail gun safely.
How do you set up a cordless nail gun for trim?
Start with the manual, correct nails and scrap from your project. Set the tool for the material before fastening visible trim.
- Check the work area. Identify solid backing and avoid locations with concealed wiring, plumbing or other hazards.
- Prepare the tool without power. Inspect it and load the approved fasteners in the direction described in the manual.
- Secure the workpiece. Use clamps or supports where needed, keeping hands away from the nail's possible path.
- Fit the battery and select the mode. Use full sequential actuation when available and follow the required startup steps.
- Drive a nail into suitable scrap. Use a sample that represents both the trim and its backing.
- Adjust depth gradually. Aim for the head position needed for the finish without crushing the surface.
- Recheck after a material change. A setting that works in one wood may leave a nail proud or drive it too deeply in another.
Keep the nose seated as the manual directs. Don't lean harder on the tool to compensate for wrong nails, a weak battery or an unresolved fault.
Plan nail placement before pulling the trigger, especially on narrow profiles. Nails can follow the wood grain and exit the side, so your free hand must stay clear of more than the visible entry point.
For brad-specific technique, see how to use a brad nailer.
What mistakes cause poor results or wasted money?
The biggest mistake is buying around a battery platform before choosing the fastener. Keeping one charger is useful only when the tool suits the joint.
Another common mistake is treating nails of the same gauge as universally compatible. Length, collation angle and head design can still differ, so match the full fastener requirements in the manual.
Don't expect trim nails to pull a badly fitted joint together. Cut and fit the pieces first, then use suitable clamps or supports while fastening.
Avoid using extra depth to hide a poor result. Overdriving can damage the trim surface and reduce the material under the nail head.
A thin brad isn't a substitute for required structural hardware or a specified framing nail. Shelves, load-bearing joints and other assemblies need fasteners chosen for their actual loads and construction requirements.
Repeatedly pulling the trigger after a misfire can make diagnosis harder and create risk. Stop, disconnect power and follow the manual before checking nails, battery condition or the driver mechanism.
If a brad nailer stops firing, our brad nailer troubleshooting guide can help you work through the common causes.
How should you care for a cordless nailer between jobs?
Keep the magazine, nose and battery connections clean, and follow the maintenance instructions for the exact model. Cordless nailers use different drive systems, so don't copy an oiling routine from another tool.
Remove the battery before inspection or cleaning. Clear accessible dust as directed, and don't force debris deeper into the mechanism.
Don't add pneumatic-tool oil unless the manual specifically calls for it. A tool that uses compressed air internally doesn't automatically need the same care as a hose-fed nailer.
Store nail strips dry and protect them from bending. Damaged or unsuitable strips can interfere with feeding even when the tool itself is working correctly.
Follow the battery manual for charging and storage temperatures. Keep the tool and batteries dry, and inspect them after a drop or other damage before returning them to use.
Which cordless nail gun should you choose?
Choose your cordless nail gun by the next project you can name, then check the projects likely to follow. That gives you a clearer decision than buying the most powerful-looking tool.
- Light trim with DeWalt batteries already available: Choose the DCN680B if its brad range fits your work.
- Light trim with compatible ONE+ batteries: Consider the Ryobi P321 after confirming its fastener range and controls.
- Light trim without a battery setup: Choose the Metabo HPT NT1850DFT kit for its included battery and charger.
- Larger trim needing thicker nails: Choose the DeWalt 15-gauge angled finish nailer when that fastener matches the joint.
- Structural framing: Choose a framing nailer and the fasteners required for the assembly.
Before ordering, write down the trim thickness, backing material and required nail type. Use those details to compare our cordless brad nailer picks and make the final choice.
Frequently asked questions
What should I look for in a cordless nail gun?
Match the nailer to the fastener your project requires, then compare battery compatibility, weight, depth adjustment and trigger controls. Check the exact nail gauge, length and collation requirements before buying nails, and confirm whether the package includes the battery and charger you need to start work.
Is a cordless brad nailer enough for trim?
An 18-gauge brad nailer suits many light trim jobs, including small decorative pieces where a narrow nail leaves a smaller hole. Larger or heavier trim may need finish nails with more holding strength; choose for the joint, backing material and trim instructions rather than assuming one nailer covers every trim project.
Do cordless nail guns include a battery and charger?
Tool-only cordless nail guns need a separate compatible battery and charger, while kits may include both. The Metabo HPT NT1850DFT kit includes a battery and rapid charger; the Ryobi P321 is tool-only; check the exact package contents and battery family before ordering, even if you already own cordless tools.
Can a cordless nail gun replace a pneumatic nailer?
A battery-powered cordless nail gun can replace a pneumatic model for jobs within its fastener range and intended use. It removes the hose and external compressor, which helps when moving between rooms; compare working weight, charging needs and the pace of your work before replacing an existing pneumatic setup.