Brad Nailer vs Pin Nailer: What Is the Difference? (October 2026)
For brad nailer vs pin nailer, choose a brad nailer for everyday trim fastening or a pin nailer for delicate details held mainly by glue. Brads provide more mechanical hold; headless pins leave smaller holes.
On this page (9 sections)
- Brad nailer vs pin nailer: what is the difference?
- Which nailer gives a stronger hold?
- What jobs suit each nailer?
- What should you check before buying either tool?
- Which brad and pin nailers fit these jobs?
- How do you set up a brad nailer or pinner?
- What mistakes cause weak joints or damaged trim?
- How should you care for these pneumatic nailers?
- Brad nailer or pin nailer: which should you choose?
A brad nailer provides more holding power, while a pin nailer leaves smaller holes in delicate woodwork. For brad nailer vs pin nailer, choose based on what must hold the piece in place, then consider how visible the fastener will be.
Brads suit everyday trim and furniture work that calls for a headed nail. Pins suit fine details where glue or the joint supplies the main strength and the fastener keeps parts aligned.
Neither tool fixes a poorly fitted joint. If you need a broader starting point, our guide to nail guns for home projects explains where these tools fit among other nailer types.

Brad nailer vs pin nailer: what is the difference?
The main difference is fastener thickness and head shape: a brad nailer uses 18-gauge nails with small heads, while a pinner uses thin, headless 23-gauge pins. A higher gauge number means a thinner fastener.
The brad's head helps resist a trim piece pulling over the fastener. A pin makes a smaller opening, but its lack of a head limits that kind of hold.
That trade-off matters more than the tool's size or name. Choose the fastening method your joint needs before comparing magazine design, weight or firing controls.
These fasteners aren't interchangeable. Use only the gauge, shape and lengths approved for the specific tool, even if another strip seems to fit inside its magazine.
Brad nailer vs pin nailer hole size
Pin holes are easier to disguise, especially on narrow moldings where a brad hole could dominate the surface. A brad leaves a larger mark because both its shank and head enter the wood.
Small holes can still show under a clear finish or light that crosses the surface. Try a sample on matching scrap and inspect it from the angle where people will see the finished piece.
For painted work, filling a brad hole is often a reasonable trade for more hold. For a fine stained detail, avoiding a larger patch may justify using pins with glue.
Which nailer gives a stronger hold?
A brad nailer generally gives more mechanical holding power, but the supporting material and joint still determine whether that hold is enough. Neither brads nor pins belong in structural joints that call for approved structural fasteners.
A fastener must reach sound backing to do useful work. Driving into a gap, a weak edge or only a thin surface layer won't create a strong connection.
Don't expect more pins to solve the wrong fastening choice. A row of tiny headless pins doesn't give a heavy or frequently bumped piece the same restraint as a suitable headed fastener.
Brads also have limits. For larger trim and related jobs, see what a finish nailer is used for before assuming a brad is strong enough.
When is a pin nailer enough?
A pinner is enough when glue or a well-designed joint carries the load and pins mainly stop small pieces from slipping. Think of a narrow cabinet molding that already fits flat against its backing.
Dry-fit the parts before applying glue. If they spring apart, rock or need firm clamping pressure to close a gap, correct the fit and use suitable clamps rather than asking pins to pull them together.
Pins can help keep a glued detail aligned, but they don't replace proper clamping when the adhesive needs pressure. Follow the glue's instructions for assembly time, clamping and curing.
What jobs suit each nailer?
Use a brad nailer for general trim attachment and a pinner for fine detail assembly. The best choice follows the joint's strength needs, the size of the piece and the finish you want.
For furniture, distinguish between attaching a decorative strip and building the main joint. A nailer may help with the strip, while the frame or load-bearing joint needs its own suitable construction method.
On picture frames, pins can keep small parts aligned during assembly. They shouldn't be expected to correct a loose miter or replace a sound frame joint.
Paneling also needs context. A pinner can suit small decorative parts, but fastening a larger panel requires checking its thickness, backing and installation method.
Read what a brad nailer is used for for more everyday applications. Our guide to what a pin nailer is used for covers the smaller details that favor headless fasteners.
Is a brad nailer better for baseboards?
A brad nailer is more suitable than a pinner for some light baseboards, but larger or thicker boards may need finish nails. Tiny pins aren't a suitable sole fastening method for holding baseboards against a wall.
Check the board's thickness, whether it sits flat and where sound backing is available. A bowed board that needs force to stay against the wall is a different job from a small, flat trim strip.
Read whether you can use a brad nailer for baseboards before choosing your tool. For heavier trim, brad nailer vs finish nailer explains the next step up.
What should you check before buying either tool?
Check fastener lengths, backing depth and the air setup before buying. A tool can have the right gauge yet still lack the length your joint needs.
Measure the piece you're attaching and consider how much fastener can safely enter the backing. Avoid choosing the longest nail by default, especially around thin assemblies, hidden wiring or surfaces where a point could emerge.
All 3 tools here need a compatible compressor and hose. Check the manual's pressure and air-delivery requirements, along with fittings and compressor cycling, before deciding that your existing setup is suitable.
Include the hose route in your plan. A hose dragging across a small assembly can shift the work or catch a delicate edge, so support it clear of the fastening area.
If you don't have an air setup, review nail guns that work without a compressor. Buying a pneumatic tool makes less sense when your workspace or project location can't accommodate the supporting equipment.
Which brad and pin nailers fit these jobs?
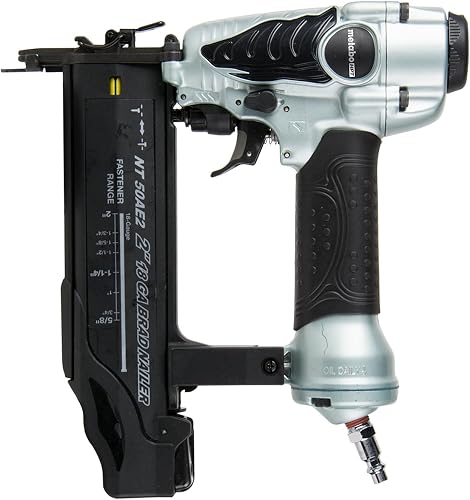
The Metabo HPT NT50AE2 suits general trim fastening, the Metabo HPT NP35A suits fine details needing longer pins, and the Arrow PT23G suits small assemblies using shorter pins. Choose the fastener type first, then the model.
Metabo HPT NT50AE2 for everyday trim
The NT50AE2 is the choice here for buyers attaching trim and furniture details that need headed brads. Its tool-less depth dial helps set the head just below the surface without digging an oversized recess.
It weighs 2.2 lb and includes a no-mar tip, an easy-to-clear nose and adjustable exhaust. The selectable sequential and bump modes offer different firing methods; sequential mode is the sensible starting point for deliberate placement.
Skip this model if your work centers on tiny clear-finished details where brad holes would be distracting. Metabo HPT backs it with a 5-year warranty.
Metabo HPT NP35A for fine cabinet details
The NP35A fits buyers making small moldings, cabinet details and similar glued assemblies. Its magazine automatically adjusts to the supported pin lengths, and depth adjustment helps match the drive to the surface.
The supported lengths are 5/8, 3/4, 1, 1 3/16 and 1 3/8 in. At 2 lb, it also has a dual trigger, rear exhaust and 2 included no-mar tips.
Choose it over the Arrow when your planned joints need the longer supported pins. Skip it when you need very short pins for thin assemblies or a headed fastener for stronger attachment.
Metabo HPT covers the NP35A with its Professional 5-Year Tool Warranty.
Arrow PT23G for small craft assemblies
The PT23G fits craft and hobby work where short pins suit the material stack. Its oil-free design removes routine tool oiling from the care process, and the side-load magazine gives access for loading and clearing jams.
Its supported lengths are 3/8, 1/2, 5/8, 13/16 and 1 in. That shorter starting length is useful when a longer pin could pass through a thin assembly.
The tool has a 2-step safety trigger and a die-cast aluminum body. Arrow specifies compressor operation up to 100 psi; follow the manual's operating instructions rather than treating the upper limit as a starting pressure.
Skip it if your joints need more reach than its maximum pin length allows. Arrow backs it with a 1-year limited manufacturer warranty.
How do you set up a brad nailer or pinner?
Start with the manual, matching fasteners and secured scrap that duplicates your joint. Set up the tool for the material before moving to the visible workpiece.
- Wear eye protection and appropriate hearing protection, and keep other people clear of the work area.
- Inspect the hose, fittings, tool and fasteners before connecting air.
- Follow the manual's sequence for loading, connecting and setting regulated pressure.
- Secure matching scrap with clamps so your hands stay clear of the fastener path.
- Make a sample drive, check both faces and adjust the setup as needed.
Aim for a properly seated fastener without a deep dent. Excess pressure or excessive depth can damage the surface, and a no-mar tip won't prevent every mark.
Don't assume the fastener will travel perfectly straight. Grain can deflect it through an edge, so keep hands away from the sides and back of the joint as well as the nose.
For brad-specific steps, follow how to use a brad nailer. Read the safe nail gun guide before connecting either type for the first time.
What mistakes cause weak joints or damaged trim?
The biggest mistakes are choosing for hole size alone, driving near unsupported edges and trying to close poor joints with fasteners. Prevent them by checking the fit and backing before firing.
Don't shoot into the very end of a narrow piece without first checking the result on scrap. Thin pins reduce the size of the entry hole, but wood can still split or a fastener can turn out through the side.
Avoid driving multiple fasteners into the same small spot to fix a missed shot. Stop, disconnect the air and inspect the problem before deciding how to remove or replace the fastener.
Don't bury the nose hard into soft wood to make the tool feel steady. Secure the work instead, keep the contact area clean and apply only the positioning pressure the manual calls for.
For finished wood, keep glue squeeze-out under control. Dried glue can interfere with stain and leave a more visible patch than the fastener hole you were trying to hide.
For painted trim, use compatible filler and let it dry fully before sanding. Inspect under side lighting so a shallow dent or raised patch doesn't appear only after the final coat.
How should you care for these pneumatic nailers?
Keep the magazine, nose and air supply clean, and follow each tool's own lubrication instructions. An oil-free tool has different care needs from a tool whose manual calls for oil.
Disconnect the air supply before clearing a jam, cleaning the nose or making adjustments that require access to the fastener path. Follow the manual's unloading steps rather than assuming a disconnected tool is empty.
Remove loose debris without pushing it deeper into the mechanism. Check the no-mar tip for grit or damage before placing it against a finished surface.
Drain and maintain the compressor as its manual directs, and inspect hoses for leaks or damage. Store the nailer dry and disconnected so moisture and debris don't build up between projects.
Brad nailer or pin nailer: which should you choose?
For brad nailer vs pin nailer, buy the tool that matches your next real joint: a headed fastener for attachment or a tiny pin for alignment during glue-up. Don't buy a pinner solely to avoid filling holes when the piece needs stronger mechanical hold.
Choose the NT50AE2 for varied trim and furniture details that call for brads. Choose the NP35A for delicate work needing its longer pin options, or the Arrow PT23G for thin craft assemblies suited to shorter pins and oil-free care.
Buy both only when you regularly do both kinds of work. If most of your projects need heavier trim fasteners, choose the appropriate finish nailer first.
Before ordering, write down your material thickness, available backing and required fastener type. Then compare brad nailer uses with pin nailer uses to confirm which tool earns its place in your workspace.
Frequently asked questions
What is the main difference between a brad nailer and a pin nailer?
A brad nailer drives an 18-gauge nail with a small head, while a pin nailer drives a thinner, headless 23-gauge pin. Brads provide more mechanical hold but leave larger holes; pins suit delicate details where glue or a well-fitted joint supplies most of the strength.
Does a pin nailer hold as well as a brad nailer?
No, a headless pin generally provides less holding power than a brad; its thin shank and lack of a head limit its grip, especially against separation. Use pins to keep small glued parts aligned, rather than relying on them to pull bowed trim tight or support heavy pieces.
Can a pin nailer replace a brad nailer?
A pin nailer can take over some delicate assembly tasks, but it cannot replace a brad nailer across general trim work. Choose it when the joint already has enough strength from glue or another fastening method; for larger trim, assess whether brads or heavier finish nails are needed.
Do pin nail holes need filling?
Pin holes sometimes need filling, especially under a clear finish or strong side lighting; their small size makes them easier to hide, but wood color and grain affect visibility. Drive a sample pin into matching scrap, apply your planned finish and inspect it before deciding to leave holes unfilled.
Should I buy a brad nailer or a pin nailer first?
Buy a brad nailer first for varied home trim and furniture projects that call for headed fasteners; buy a pinner first for miniature moldings, crafts and fine details held mainly by glue. If your next job needs larger finish nails, neither tool should be your first choice for it.