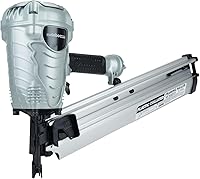
How to Choose a Framing Nailer
Choose a framing nailer by matching the required nails and power setup to your project. Then compare loaded weight, access to corners, depth adjustment and firing modes.
On this page (8 sections)
- What should you check before choosing a framing nailer?
- Should you buy a pneumatic or cordless framing nailer?
- Which framing nailer fits your setup?
- How do you set up a framing nailer for the first job?
- How should you use depth adjustment and firing modes?
- What mistakes cause poor framing nailer results?
- How do you care for a framing nailer?
- Which framing nailer should you choose?
Choose a framing nailer by matching your project's required nails and power setup before comparing extra features. The right tool accepts the correct fasteners, reaches your joints and stays manageable through the work you plan to do.
A homeowner building one shed has different needs from someone fastening wall sheathing all day. Short repair jobs favor quick setup, while long sessions make weight, air supply and nail availability more important.
If you're still choosing between tool types, start with our complete guide to nail guns for home projects. A framing nailer belongs on structural woodwork and similar heavy fastening jobs, rather than delicate trim.
What should you check before choosing a framing nailer?
Start with the connection you need to build, then choose compatible nails and a tool that drives them. A convenient magazine angle or familiar battery brand shouldn't decide the fastener used in a structural joint.
For work covered by plans, a fastening schedule or connector instructions, follow those requirements first. Nail length, shank diameter, head style and corrosion protection can all matter.
| Check | What it means for your choice |
|---|---|
| Connection requirements | Determine the nails before choosing the tool |
| Nail compatibility | Match angle, collation, length, diameter and head style |
| Power setup | Allow for either air equipment or battery charging |
| Working space | Check access to corners and angled joints |
| Loaded weight | Include nails and the battery where applicable |
| Controls | Look for depth adjustment and suitable firing modes |
| Support | Consider maintenance access, parts and warranty coverage |
How does framing nailer angle affect your choice?
Magazine angle describes the nail strip format, not the angle at which every nail enters the wood. A 30 degree magazine doesn't mean you must drive nails into a joint at 30 degrees.
A steeper magazine can help with access around framing members. Metabo HPT specifically designs the NR90ADS1's magazine to help in tight corners, making it worth considering when access drives the purchase.
Check local nail availability before choosing a format. Being able to get the right strips nearby matters more than saving a small amount of setup time with a tool you can't readily reload.
Which nail details matter beyond length?
Diameter, head style and collation matter as much as length when matching nails to a tool. Two boxes marked for framing can contain fasteners that aren't interchangeable.
Collation holds nails together for feeding, usually with plastic or paper in the models covered here. Use the format specified for the exact nailer rather than assuming similar-looking strips will work.
For outdoor work, match the fastener's corrosion protection to the lumber, exposure and connection requirements. A tool's suitability for fencing doesn't make every nail it accepts suitable for treated lumber.
Don't assume ordinary framing nails can replace connector nails. Metal hangers and other structural connectors can call for specific fasteners and tools.
Should you buy a pneumatic or cordless framing nailer?
Choose pneumatic for work with a suitable air supply already in place. Choose cordless when avoiding compressor setup and hose routing will save effort across your actual jobs.
Both systems need supporting equipment. Compare the complete setup rather than the nailer alone.
When pneumatic makes more sense
A pneumatic tool suits a fixed work area where the compressor can stay nearby and the hose can run clear of your feet. It also suits buyers who already own air equipment that meets the tool's requirements.
Check the manual's operating pressure and air demand against your compressor's output. Tank size alone doesn't show whether a compressor can keep up with repeated firing.
Think about hose routing before buying. A hose caught around lumber, a ladder or a work platform can interrupt placement and create a trip hazard.
When cordless makes more sense
Cordless suits repairs spread across a property, small additions to existing framing and work where each move would require repositioning a hose. It removes the compressor from your setup routine.
Plan charging around the length of your workday. A charged battery can make a short job simple, while a long session may require charging breaks or another compatible battery.
Compare working weight, including the battery and nails. Removing a hose doesn't automatically make a tool lighter in your hand.
Our cordless and pneumatic nailer comparison explains the setup trade-offs in more detail.
Which framing nailer fits your setup?
These four tools serve different buyers based on nail format, working weight and mobility. Choose the one that removes a real obstacle in your work, rather than buying features you won't use.
Metabo HPT NR90AES1 21 Degree Framing Nailer
The NR90AES1 suits buyers with compatible air equipment who want a lighter pneumatic option for general framing. It weighs 7.5 lb and accepts 21 degree plastic collated framing nails from 2 to 3-1/2 in.
Its uses include subflooring, truss build-up and window build-up. Selective actuation lets you switch between sequential and contact nailing, while tool-less depth adjustment helps set the drive depth.
Choose it for a project where the matching fasteners are readily available and the hose can stay clear. It's a sensible starting point for framing work without a special need for a paper collated format.
Skip it if you want to avoid air equipment or your project requires nails outside its accepted format. Metabo HPT backs it with a 5-year tool warranty, and its head guard is designed for easier disassembly during maintenance.
Read our Metabo HPT NR90AES1 review for a closer look at its fit for different jobs.
Metabo HPT NR90ADS1 30 Degree Framing Nailer
The NR90ADS1 suits buyers who need paper collated nails or better access to tight corners. It accepts 30 degree paper collated clipped head and offset round head nails from 2 to 3-1/2 in and weighs 7 lb.
That makes it the lightest of these three pneumatic examples. Consider it when you expect frequent repositioning around studs and other framing members, provided its accepted nails meet the job requirements.
It includes selective actuation and tool-less depth adjustment. Metabo HPT also designs the head guard for quicker maintenance access and backs the tool with a 5-year warranty.
Skip it if you need to keep using a stock of 21 degree plastic collated nails. Changing to this tool means choosing its matching nail format, even when the nail lengths look familiar.
Confirm the accepted head style meets your plans before ordering. The magazine's access benefit doesn't override a connection's fastener requirements.
NuMax SFR2190 21 Degree Framing Nailer
The SFR2190 suits buyers combining framing, crate assembly or wood fencing who value its surface and exhaust controls. It accepts 21 degree plastic collated full round head nails from 2 to 3-1/2 in, with diameters of 0.113 to 0.131 in.
Its no-mar tip helps protect the work surface, and the adjustable exhaust lets you direct discharged air away from your face. An anti-dry-fire mechanism prevents empty firing, while the comfort grip supports handling.
The main trade-off is its 8.6 lb tool weight. Skip it if reducing hand-carried weight is your main goal for long sessions or raised work.
NuMax covers it with a 1-year limited warranty and a separate 30-day wearable parts warranty. Those terms differ from the Metabo HPT pneumatic models, so consider service coverage alongside the controls.
For fence-specific choices, see our guide to nail guns for fencing, then match the fasteners to your lumber and construction method.
Metabo HPT NR1890DRA 18V Framing Nailer Kit
The NR1890DRA kit suits buyers who want a framing tool without an air hose, especially for short jobs or frequent moves. It has a 21 degree magazine and includes a battery, charger, wrench, bag and safety glasses.
Metabo HPT says its air spring drive system has no ramp-up time and can drive nails up to 3-1/2 in into hard materials such as engineered lumber. It also includes tool-less depth adjustment and selectable sequential or bump modes.
The tool weighs 8.4 lb without the battery. Skip it if low working weight matters more than removing the hose, especially when your compressor setup already works well.
Metabo HPT claims up to 500 framing nails per charge with a 4.0Ah battery. Plan charging around your work rather than treating that maximum as a fixed nail count for every material and fastener.
Metabo HPT backs the tool body with a lifetime warranty, the battery for 2 years and the charger for 1 year. Compare other formats in our best cordless framing nailers guide.
How do you set up a framing nailer for the first job?
Start with the manual, the right fasteners and scrap matching your project lumber. A short setup check helps you find feeding or depth problems before you fasten the actual assembly.
Check the tool before connecting power
With the power disconnected and nails removed, inspect the magazine, nose, housing and fittings for damage. Check that the work contact moves freely as instructed in the manual.
Wear eye and hearing protection, and keep other people clear of the fastening area. Check behind the joint for hands, wiring, plumbing or anything a misplaced nail could strike.
For pneumatic tools, inspect the hose and fittings before connecting air. For cordless tools, check that the battery is compatible, charged and free of visible damage.
Set air supply and load in the correct order
Follow the manual's connection and loading sequence, since it can differ between tools. Keep your finger off the trigger and point the nose away from people throughout setup.
Set a pneumatic tool within its stated pressure range. If nails sit proud, don't keep increasing pressure without checking nail compatibility, depth adjustment and air supply first.
Use clean, undamaged nail strips. Bent nails or broken collation can interfere with feeding, so don't force a damaged strip into the magazine.
Set depth on matching scrap
Use scrap of the same material and thickness to set depth before fastening the work. Hold the tool as directed and make a few controlled shots away from edges.
For joints requiring a flush head, aim for the head to sit at the surface without crushing it. Deeply buried heads can damage sheathing or reduce the usefulness of the connection.
Check depth again when changing lumber, nail length or material. A setting that works on one board may drive differently into a denser piece.
How should you use depth adjustment and firing modes?
Use depth adjustment for seating and the firing mode for controlling the firing sequence. Neither control corrects a poor nail choice or an unsafe hand position.
Sequential firing requires a deliberate sequence involving the work contact and trigger. Use it for controlled placement, especially while learning the tool or fastening near a specific mark.
Contact or bump firing can allow rapid repeated fastening, but it also raises the risk of unintended discharge. Follow the manual and jobsite rules rather than choosing it simply to finish faster.
Keep your free hand away from the nail path, including behind the wood. Nails can deflect, pass through a joint or exit a board's side.
Position your body so recoil won't push you off balance. Never use the tool itself to pull a board into place while your hand sits near the firing point.
Read how to use a nail gun safely before operating one. For a clearer view of suitable jobs, see what a framing nailer is used for.
What mistakes cause poor framing nailer results?
Most avoidable problems start with wrong fasteners, poor setup or rushed placement. Check the cause before changing settings or forcing the tool to continue.
- Buying by nail length alone: Match every required fastener detail, including diameter and head style.
- Using one setting for all materials: Recheck depth when lumber or fasteners change.
- Overdriving sheathing nails: Follow the fastening requirements and correct the depth before continuing.
- Forcing awkward access: Reposition the work or use a suitable fastening method instead of twisting into an unstable stance.
- Ignoring the hose: Keep it clear of edges, walkways and places where it can pull on the tool.
- Continuing after repeated misfeeds: Disconnect power, unload as directed and inspect the feed path.
If a pneumatic nailer begins leaving nails proud during rapid work, check the air supply and hose for restrictions or leaks. A compressor that keeps up with occasional shots may struggle with sustained firing.
Don't add random nails to a joint to make up for poor placement. Follow the required spacing and edge distances, and get direction on correcting structural connections when necessary.
How do you care for a framing nailer?
Keep the feed path clean and the tool dry, and follow its specific lubrication instructions. Don't assume every nailer needs the same oil or maintenance schedule.
Disconnect the air supply or remove the battery before clearing a jam or carrying out maintenance. Remove nails as directed, and remember that a jammed fastener can remain in the drive path.
Brush debris from accessible magazine areas without forcing dirt deeper into the tool. Inspect the nose, work contact and fastener guides for damage or stuck material.
Only add pneumatic tool oil if the manual calls for it, using the specified amount and type. Never put oil into a cordless tool's air spring system unless its service instructions expressly require it.
Drain the compressor according to its manual and store hoses without sharp kinks. Keep paper collated nails dry and store all nail strips where they won't bend or collect debris.
For cordless tools, follow the battery's charging and storage guidance. Stop using a tool with a damaged contact mechanism, persistent air leak or repeated firing fault until it receives proper service.
Which framing nailer should you choose?
Choose your framing nailer by the fasteners first, then remove the biggest setup or handling problem in your work. Use this decision order once you know the connection requirements:
- Choose the NR90AES1 for general pneumatic framing with matching plastic collated nails.
- Choose the NR90ADS1 for the paper collated format and a magazine designed for tight corners.
- Choose the SFR2190 when its fencing and construction uses, no-mar tip and exhaust control fit your work.
- Choose the NR1890DRA kit when avoiding a compressor and hose makes frequent moves or small jobs easier.
Before ordering, confirm nail availability and the full equipment you need to begin. Include air fittings and a suitable hose for pneumatic tools, or a charging plan for cordless work.
If none of these matches your required fasteners or working conditions, widen the search rather than changing the joint to suit the tool. Our best framing nailers guide is the next place to compare options.
Frequently asked questions
What should I look for in a framing nailer?
Start with the fasteners your project requires, then choose a nailer that accepts their angle, collation, length, diameter and head style. Compare its power setup, loaded weight and access to your joints; depth adjustment and sequential firing help with controlled placement, but they don't replace the correct nails.
Is a 21 degree or 30 degree framing nailer better?
Choose the angle that matches your required nails and working space. The Metabo HPT NR90ADS1 uses a 30 degree paper collated format and has a magazine designed for tight corners; the two 21 degree pneumatic models here use plastic collated nails, so their nail strips aren't interchangeable with its paper strips.
Do I need a cordless framing nailer?
Choose cordless when short jobs, frequent moves or awkward hose routes make compressor setup a burden. Pneumatic is a practical choice when compatible air equipment is already in place; compare the whole system, including hose management for air tools and battery weight, charging and spare battery needs for cordless tools.
What size nails does a framing nailer use?
The three pneumatic models here accept nails from 2 to 3-1/2 in long, but their other fastener requirements differ. Metabo HPT describes the cordless NR1890DRA as driving nails up to 3-1/2 in; choose nail size from the connection requirements, then confirm every fastener detail against the tool manual.